.png)
How to Fix Leaky Pipes: A Practical DIY Guide for Bournemouth, Southampton & Highcliffe
- Dan Hall
- Nov 27, 2025
- 16 min read

That sinking feeling when you spot a puddle spreading from under the kitchen sink or hear the dreaded drip-drip-drip from inside a wall is a universal homeowner experience. Panic can easily set in, but quick, calm action is your best defence against serious water damage.
Whether you're in a flat in Bournemouth or a house in Southampton, your first moves are always about containment, not repair. Water can wreck flooring, cause structural damage, and lead to mould growth in a surprisingly short amount of time. The goal is to stop the flow of water as safely and quickly as possible. Knowing how to fix leaky pipes starts with knowing how to stop them from causing damage.
Your First Moves When You Find a Leaky Pipe in Highcliffe
Before you even think about tools or repair kits, you absolutely must get the water shut off. This is the single most important thing you can do to minimise the mess and the cost.
Every home has a main water shut-off valve, often called a stopcock. It's not always in the most obvious place, so it pays to know where yours is before an emergency.
Common spots include:
Under the kitchen sink
Tucked away in a utility or airing cupboard
In the garage or cellar
Outside, near the water meter, often under a small cover on the pavement or in your garden
Turning it off is usually simple: turn it clockwise until it stops. This single action cuts the water supply to your entire property, effectively starving the leak at its source. If you don't know where yours is, find it tonight. You’ll thank yourself later.
Remember this simple rule: "righty-tighty, lefty-loosey." Turning the valve clockwise closes it. This is the most critical first step to prevent further water damage.
Drain the System and Manage the Spill
Even with the main valve closed, there’s still water sitting in the pipes. To get it out, open the taps on the lowest floor of your home—a garden tap or a downstairs bathroom sink is perfect for this. It also helps to open the taps closest to the leak to relieve any remaining pressure in that section.
Next, get a bucket and some old towels under the drip to catch what's left. If you're dealing with a more significant leak, don't hesitate to use old blankets or a wet/dry vacuum to get standing water off the floor. The quicker you dry the area, the less chance moisture has to seep into subflooring, skirting boards, and walls.
In the unfortunate event of a major leak, knowing the immediate steps to take after a pipe burst can save you from thousands in damage.
The moment you discover a leak, every second counts. This simple action plan breaks down what to do immediately to control the situation and prevent a small drip from becoming a major disaster.
Leaky Pipe Emergency Action Plan
Priority | Action to Take | Why It's Critical |
|---|---|---|
1 (Highest) | Shut Off the Main Water Valve | Immediately stops more water from entering your home's plumbing, preventing further flooding and damage. |
2 | Turn Off Power to the Area | Prevents the risk of electric shock if water comes into contact with outlets, wiring, or appliances. Safety first. |
3 | Drain the Pipes and Contain the Spill | Empties remaining water from the system and minimises damage to floors, walls, and furniture. |
Following these steps in order turns a chaotic situation into a manageable one, paving the way for a safe and effective repair.
This infographic neatly sums up these crucial emergency steps.
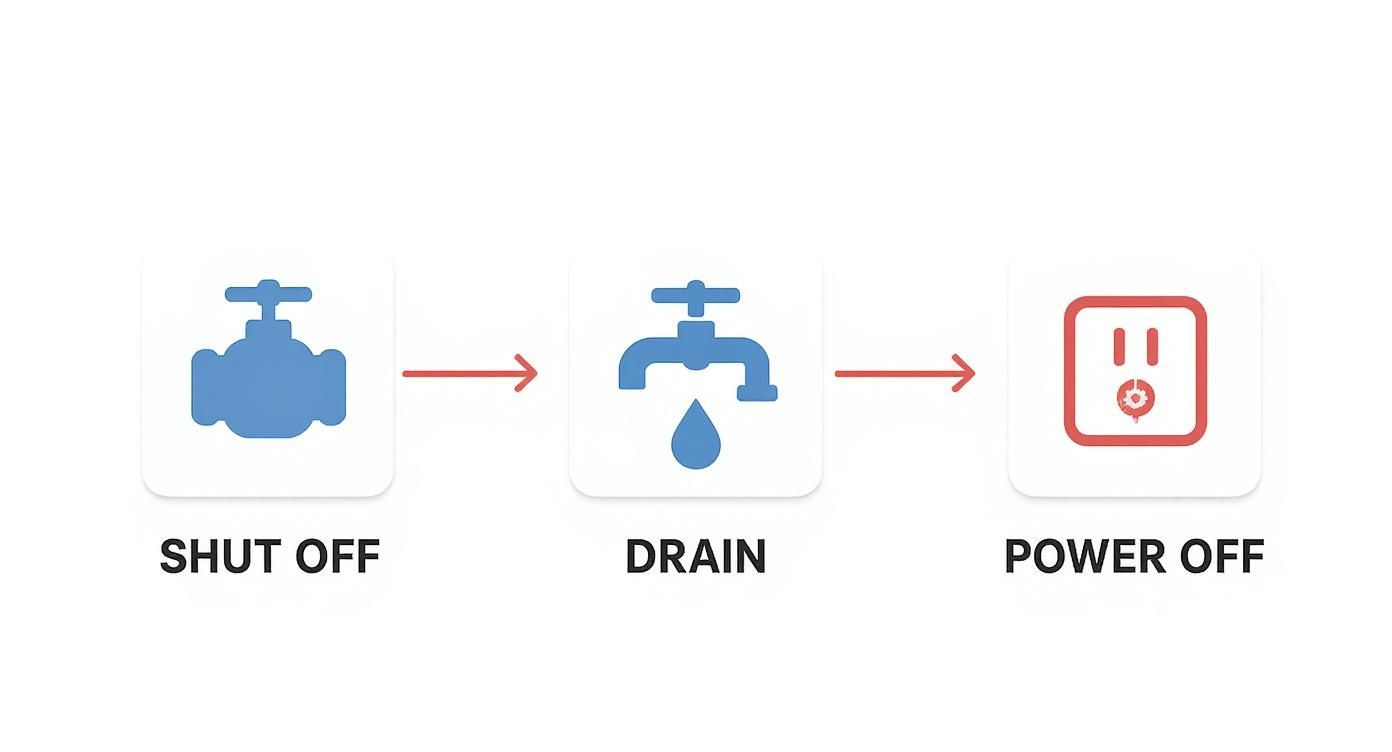
As you can see, controlling the situation by shutting off the water and power is always the priority before you even think about attempting a repair.
Address Electrical Hazards in Poole Homes
Water and electricity are a lethal mix. If the leak is anywhere near electrical outlets, appliances, or extension cords, your next job is to kill the power to that part of the house.
Head to your consumer unit (or fuse box) and switch off the circuit breaker for the affected room. If you aren't sure which one it is, play it safe and turn off the main power switch for the whole property.
Never, ever touch electrical switches or devices if you are standing in water. Your personal safety is paramount.
Once these steps are complete, you've successfully managed the immediate crisis. Now you can take a breath and start to figure out what's gone wrong. When you're ready, finding a plumber in Christchurch you can trust will be the next step for getting a professional, long-lasting solution from our in-house service.
Diagnosing the Cause of Your Pipe Leak in Christchurch
Right, with the immediate panic over, it’s time to play detective. Figuring out exactly why your pipe has sprung a leak is the single most important step. A fix for a loose joint is worlds away from tackling a corroded pipe, and if you get it wrong, you’ll be right back here with a soggy floor in no time.
First thing’s first: grab an old towel and get the pipe and the whole area around it completely dry. Then, get a torch and have a really good look. Water has a sneaky habit of running along the length of a pipe before it actually drips, so you need to trace the wetness back to its highest point. This simple trick stops you from trying to patch a bit of pipe that was never the problem to begin with.
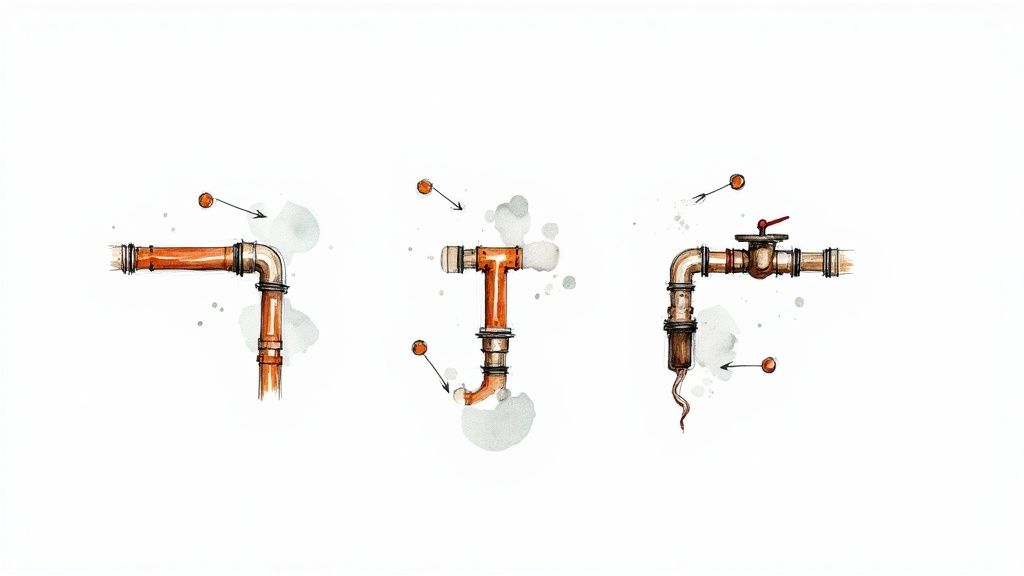
Identifying Common Leak Culprits
After years of call-outs to homes across Ringwood and Poole, our in-house service has found that most leaks boil down to a handful of usual suspects. Knowing what you’re looking for makes assessing the situation much easier.
Loose or Failed Joints: This is often the best-case scenario. The drip is coming from a threaded fitting or a joint where two pipes connect. Sometimes, it’s just a connection that has gradually worked itself loose over the years.
Pinhole Leaks: These are tiny, frustrating holes in the pipe itself, usually caused by corrosion eating its way out from the inside. It might look like a fine mist or a single, stubborn drip. On copper pipes, you’ll often spot a tell-tale patch of greenish-blue discolouration around it.
Cracked Fittings or Pipes: A much more serious problem. Physical cracks can be caused by anything from frozen water and extreme pressure to an accidental knock. These leaks can be quite severe and almost always mean a section of pipe needs replacing.
Valve Failures: Those little shut-off valves under your sink or behind the loo have rubber seals inside that wear out over time. This leads to a constant, slow leak from the valve’s handle or stem.
Pro Tip: Take a dry piece of kitchen roll and gently run it over the area you suspect is leaking. The paper will show even the tiniest speck of moisture instantly, helping you nail down the exact source of a leak that’s too small to see clearly.
Assessing the Severity of the Leak
Once you’ve found the type of leak, you need to judge how bad it really is. This is what decides whether you’re looking at a manageable DIY job or a "call for backup" situation. If you'd like more in-depth advice, there are some great easy DIY tips on how to find water leaks in your home.
Think about it: a slow drip from the sink trap in your Bournemouth kitchen is a world apart from a steady flow gushing from a mains pipe in your Southampton cellar. Is it a slow, annoying drip, or is it actively spraying water everywhere? Does the pipe itself look brittle and covered in corrosion, or is the damage just in one small spot?
If you see widespread rust, lots of little pinhole leaks, or a major crack, that’s a big red flag. These are usually signs of a much bigger issue with your plumbing that a simple patch-up job won't fix. Trying to repair a heavily corroded pipe can easily make a small leak a whole lot worse.
When to Call Our In-House Plumbing Service
Being a smart DIYer isn't just about knowing how to fix things; it's also about knowing when not to. A slight weep from a threaded joint can often be solved by giving it a gentle tighten. But some situations really are best left to our professional service to avoid a minor drama turning into a major disaster.
You should seriously consider calling our in-house service if:
The leak is coming from a main water supply line.
The pipe is hidden inside a wall, floor, or ceiling.
The pipe is clearly old or shows significant signs of rust and decay.
You just aren’t confident you can pull off a secure, long-lasting repair.
Trying to tackle a complex job without the right tools and know-how can quickly lead to a much bigger flood and a much bigger bill. Our in-house service team is always on hand to get it sorted properly the first time, giving you total peace of mind. For more handy advice, check out The Ultimate Guide to Plumbing Tips, Techniques, and Services for Christchurch.
Your Essential Pipe Repair Toolkit
Walking into a hardware store in Bournemouth or Southampton unprepared for a plumbing repair is a recipe for frustration. The sheer number of products on the shelves can be overwhelming, and grabbing the wrong thing means a second trip while water is still dripping somewhere back home. Knowing exactly what you need before you go is the key to a successful, stress-free fix.
Think of this as your definitive shopping list for tackling common leaky pipes. Having the right tools and materials ready not only saves you a headache but also ensures your repair is as solid as it can be.
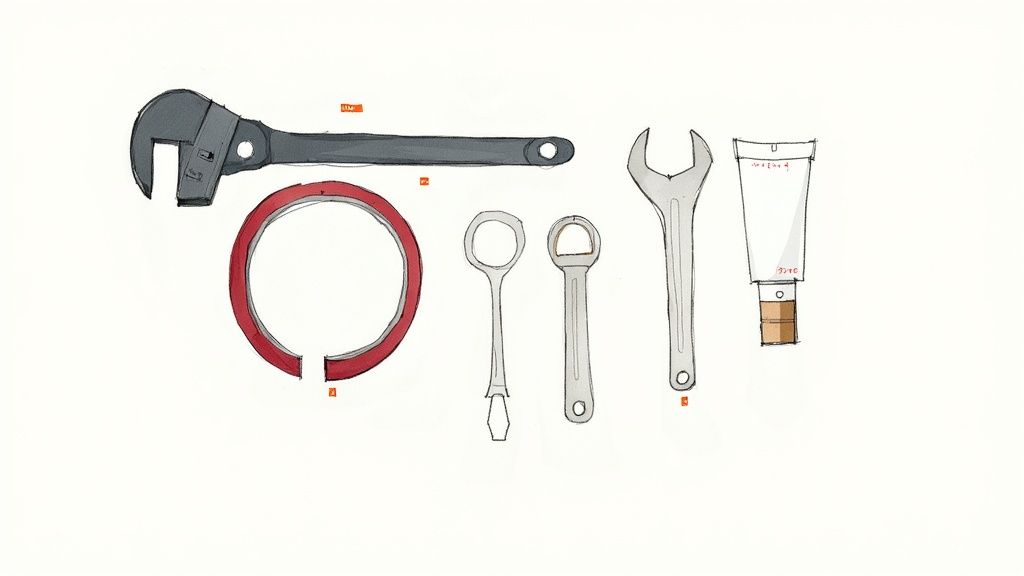
Core Tools Every Homeowner Should Have
You don't need a professional plumber's entire van rattling around in your shed, but a few key items will handle most minor pipe repairs. These are the workhorses of any basic plumbing kit and are well worth the small investment.
Adjustable Spanner (Wrench): A truly versatile tool, perfect for tightening or loosening the compression fittings and nuts you'll find on pipes under sinks and basins.
Pipe Wrench: For pipes that are a bit more stubborn, a pipe wrench provides a much stronger grip. It's almost essential for getting any purchase on older, threaded iron pipes.
Tube Cutter: If you need to remove a damaged section of copper or plastic pipe, a tube cutter gives you a clean, straight cut that a hacksaw just can't match. This is crucial for making sure new fittings seal properly.
Wire Brush: Before you apply any patch or fitting, the pipe's surface needs to be completely clean. A wire brush is perfect for scrubbing away corrosion, grime, and old paint to guarantee a tight seal.
Choosing the Right Repair Materials in Poole
This is where many DIY repairs go wrong. The material you pick depends entirely on the type of pipe, where the leak is, and whether you're after a quick fix or a more lasting solution. Making the right choice here is absolutely critical for a watertight result.
Epoxy Putty: This is a fantastic all-rounder for small cracks and tiny pinhole leaks on both metal and plastic pipes. You just knead the two parts together to activate it, then mould it firmly over the leaky area. It hardens into a rock-solid, waterproof seal.
Pipe Repair Clamp: For a more serious split or a larger hole, a pipe clamp is your best bet. It’s a simple but effective device: a rubber sleeve goes over the leak, and a metal clamp tightens around it, applying immense pressure to stop the flow of water instantly.
Self-Fusing Silicone Tape: This stuff is a brilliant temporary fix, especially for leaking joints where clamps won't work. The tape doesn't have a traditional adhesive; it fuses to itself when stretched and wrapped tightly around a pipe, creating a seamless, waterproof rubber layer.
Remember, most DIY products are designed as temporary solutions to stop water damage in its tracks. While effective, they are not a substitute for a permanent professional repair from our in-house service, especially on high-pressure water mains.
Temporary vs Permanent Pipe Repair Options
Deciding between a quick patch and a proper repair is a critical step when you want to know how to fix leaky pipes. The table below compares common methods to help you choose wisely. For homeowners considering larger projects, understanding the basics of pipework is essential. You can learn more by exploring our complete UK installation guide for new line plumbing.
Repair Method | Ideal for Leaks On | Expected Durability | DIY Difficulty |
|---|---|---|---|
Epoxy Putty | Small cracks & pinholes on straight pipes (copper, PVC) | Months to a year, but can become brittle over time. | Easy |
Silicone Tape | Leaking joints and awkward angles as a very short-term fix. | Days to weeks. Best for immediate emergency use only. | Easy |
Pipe Clamp | Larger splits and holes on straight, accessible pipes. | Can last for months, providing a very strong temporary hold. | Moderate |
Replacing a Section | Any significant damage, crack, or widespread corrosion. | Permanent. This is the only true long-term solution. | Difficult |
While a temporary fix can be a lifesaver in an emergency, it really only buys you time rather than solving the underlying problem for good. For a guaranteed, permanent solution that protects your property, our in-house plumbing services are always here to help.
Getting Hands-On: Common DIY Pipe Repair Methods
Alright, ready to roll up your sleeves? This is where we move from theory to practice. With the right approach, you can get a handle on many common pipe leaks yourself, saving you the stress of an emergency call-out. We'll walk through the most reliable DIY techniques, focusing on fixes that don't involve complex skills like soldering.
Think of these as your first line of defence, perfect for stopping a drip in its tracks and preventing water damage from spreading. But first, a crucial rule: always start with a clean, dry pipe. Use a wire brush to get rid of any rust or grime, then wipe it down with a rag. A clean, dry surface is non-negotiable for a watertight seal.
Applying a Pipe Clamp for a Secure Temporary Hold in Christchurch
A pipe clamp is a brilliant bit of kit, especially for a split or a pesky pinhole leak on a straight run of pipe. It’s a simple but effective mechanical fix: a tough rubber gasket gets forced over the hole by the clamp, physically blocking the water. It's a robust and reliable temporary solution.
To get one on properly, centre the rubber sleeve directly over the leak. Make sure it’s lying completely flat against the pipe—no wrinkles or folds. Next, fit the two metal halves of the clamp around the sleeve and start tightening the screws.
The trick is to tighten the screws evenly. A bit on one side, then a bit on the other, just like you would when changing a car tyre. This even pressure ensures the gasket creates a solid, dependable seal. If you crank one side down first, you'll likely pinch the rubber and cause a new, smaller leak right at the edge of the clamp.
Using Epoxy Putty for a Rock-Solid Seal in Bournemouth
For small cracks or pinholes, epoxy putty is a fantastic fix. This stuff is basically a two-part modelling clay that, once mixed, cures into a waterproof, rock-hard patch. It’s incredibly versatile and bonds well to both copper and PVC pipes.
Start by cutting off a small piece and kneading it between your fingers. You’ll see two different colours blend into one uniform shade. This kneading activates the chemical reaction that makes it harden; you’ll even feel it start to warm up a bit.
Once it's fully mixed, press the putty firmly over the clean, dry leak area. Be generous. You want to mould it so it extends at least an inch around the hole in every direction, creating a wide, secure patch that grips the pipe’s surface. Let it cure for the time stated on the packaging (usually about an hour) before you slowly turn the water back on.
Pro Tip: Always wear disposable gloves when working with epoxy putty. It’s incredibly sticky and a real pain to get off your skin once it starts to set. It also keeps oils from your skin off the pipe, which could weaken the final bond.
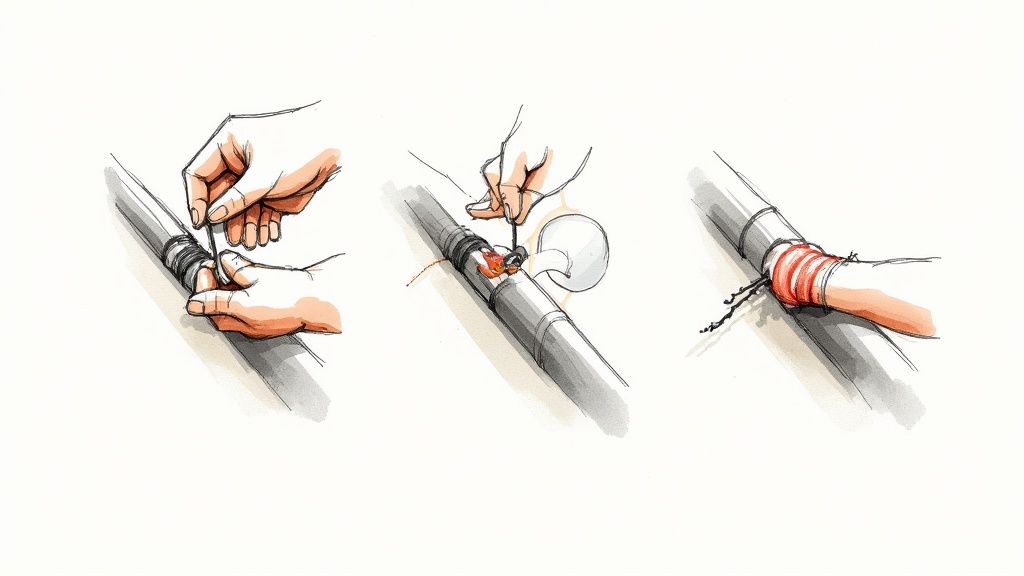
The Self-Fusing Silicone Tape Technique for Ringwood Joints
But what about those awkward leaks on a threaded joint or a bend where a clamp just won’t fit? This is where self-fusing silicone tape really shines. This isn’t your average sticky tape; it has no adhesive at all. Instead, it chemically bonds to itself when stretched, creating a seamless, waterproof rubber casing around the pipe.
The key to using it effectively is tension. Start wrapping about three inches to one side of the leak. Pull the tape tight as you go—stretching it to about twice its normal length—and overlap each new layer by about half the tape's width.
Keep wrapping past the leak for another three inches. That constant stretching is what creates the fusion and the watertight seal. A common mistake is not pulling it tight enough, which leaves a loose wrap that won't hold back the pressure. For a small joint leak in a Poole home, this can be a real lifesaver, buying you precious time.
While these DIY methods are excellent for getting you out of a jam, they are temporary fixes. For a permanent, guaranteed repair that ensures the long-term health of your plumbing, it's always best to use our professional in-house service. Our expert team in Southampton is on hand to provide a lasting solution, giving you complete peace of mind.
Knowing When to Call a Professional Plumber
Getting to grips with DIY is a brilliant way to handle small jobs around the house, but a smart homeowner also knows their limits. While fixing a minor drip under the sink can feel like a win, some leaks are more than just a nuisance—they’re red flags for serious underlying problems that need a professional eye.
Trying to tackle these bigger issues yourself can quickly spiral a small problem into a costly, water-damaged nightmare. Knowing how to fix a leaky pipe is one thing, but knowing when to put the wrench down and call our in-house service for backup is just as important.
Red Flags That Demand a Professional Plumber in Southampton
Some plumbing jobs are simply too risky for a DIY fix. If you come across any of these scenarios in your Poole or Ringwood home, your very next move should be to call in our professional in-house service. Don't hesitate.
Major Bursts or Gushing Water: If water is spraying or gushing out and you can't stop it by turning off the main stopcock, you've got a full-blown emergency on your hands.
Leaks Hidden Inside Walls or Ceilings: That damp patch you can see is often just the tip of the iceberg. Behind the plasterboard, water could be soaking insulation, rotting structural timber, and creating a perfect breeding ground for mould.
Trouble with the Main Water Line: Any leak on the pipe that brings water into your property from the street is a serious issue. These repairs require specialised equipment and knowledge of local water authority regulations.
Obvious Signs of Widespread Corrosion: If the pipe that’s leaking looks brittle, is covered in rust, or has multiple pinhole leaks, a simple patch is only a temporary fix at best. The entire section is compromised and needs replacing by a pro.
Trying to handle complex repairs without the proper expertise can lead to more damage, and it might even invalidate your home insurance if things go badly wrong. Think of a professional repair from our in-house service as a smart investment.
The Real Cost of Delaying a Professional Fix in Poole
Putting off that call to a plumber might feel like you're saving money in the short term, but it almost always costs more down the line. A slow, persistent leak can cause an incredible amount of hidden structural damage over weeks and months.
The UK plumbing sector is projected to be worth almost £24 billion by 2025, a figure driven largely by essential repairs just like this. And with a significant shortage of skilled plumbers and over 1.8 million annual job searches for their services, you can see why getting an expert out isn't always cheap—emergency call-outs can range from £20 to £95 per hour. You can learn more about the UK plumbing industry trends and understand why acting fast is crucial.
Delaying a fix allows a small issue to escalate, turning a straightforward repair into a huge project that could involve plasterers, decorators, and electricians. Our expert plumbers in areas like Christchurch and Bournemouth don’t just patch the problem; they provide a lasting solution. When you’re facing a difficult leak, the safest and most reliable way to protect your home is by using our professional in-house plumbing service. We make sure the job is done right the first time, saving you future headaches and expense.
Your Leaky Pipe Questions Answered
Even with the best guide, a surprise leak can leave you with questions. We get calls all the time from homeowners in Highcliffe, Bournemouth, and across the region, so we've put together answers to the most common queries we hear.
How Long Will A Temporary Pipe Repair Actually Last?
Honestly, a temporary fix is just that—a stopgap. How long it holds really depends on what you've used and how bad the leak was to begin with.
A good-quality pipe clamp, fitted snugly over a simple pinhole leak, might see you through for a few months. But it’s not a permanent solution by any stretch. Likewise, epoxy putty can form a rock-solid seal that holds for a good while, but it can turn brittle over time, especially as the pipes heat up and cool down.
Think of these as emergency first aid. Silicone tape? That's a very short-term patch, really only good for a day or two. The goal is always to stop the immediate water damage until you can get a proper, professional repair sorted with our in-house service, especially for critical supply lines.
Should I Try To Fix A Leaking Pipe Inside A Wall in Southampton?
Our professional advice is a firm no on this one. Tackling a leak hidden inside a wall is a whole different ball game from a simple under-sink repair, and it’s a classic pitfall for even the most confident DIY enthusiast.
You could easily cut into hidden electrical wires, compromise the structural supports of your home, or accidentally turn a tiny drip into a full-blown flood. More importantly, leaks inside walls often cause serious unseen damage like mould and rot, which are bad news for your home's structure and your family’s health. That persistent damp can lead to much bigger problems down the line. If you're worried about damp, our guide on how much damp proofing can cost is a great resource.
Our plumbers in Christchurch use specialist kit like moisture meters and thermal imaging cameras to find the exact source of the leak with minimal fuss or damage. This lets our in-house service get straight to the pipe, make a permanent fix, and make sure the whole area is dried out properly to prevent any long-term issues.
Is Water Damage From A Leaky Pipe Covered By Home Insurance in Poole?
This is a great question, but the answer isn't always straightforward. Most standard home insurance policies in the UK will cover the damage caused by a sudden "escape of water," like a burst pipe.
But there are a couple of crucial things to be aware of:
The Repair Itself Isn't Covered: Your insurance will likely pay for the consequences—like replacing a soggy carpet or repairing a damaged ceiling—but not the actual plumbing work to fix the pipe.
Gradual Leaks Are a Grey Area: Insurers often reject claims for damage caused by slow, ongoing leaks that they put down to poor maintenance. Their argument is that the homeowner had plenty of time to spot and fix the issue before it got out of hand.
This is exactly why acting fast is so important. The moment you find a leak, you should be on the phone to both your insurer and our professional in-house service. We can help document everything, start the repairs immediately, and show your insurer you acted responsibly to limit the damage. A quick, professional response from our in-house service is your best bet for a successful claim.
When a quick fix won't cut it, you need a lasting solution from a team you can rely on. The Hallmoore developments team is on call 24/7 for emergencies across Hampshire and Dorset. We deliver expert, guaranteed repairs for any plumbing issue, big or small, making sure your home is safe and sound. For real peace of mind and a job done right with our in-house service, find us at https://www.hallmoore.co.uk.
Comments