.png)
How Long Does Plastering Take for a UK Home Renovation
- Dan Hall
- Jan 13
- 14 min read

If you're planning a renovation in Poole or Christchurch, one of the first questions you'll likely ask is, "how long does plastering take?" It’s the million-dollar question for scheduling everything else. For a standard room, a professional plasterer from our in-house service is usually on-site for 2-3 days, while a full house skim could take anywhere from 5-7 working days.
Getting this timeframe right is the first step to a smooth project.
Plastering Timelines: A Quick Guide For Your Home
When you're juggling trades and trying to line everything up, timing is everything. For a typical room in a three-bedroom semi—the kind you see all over Hampshire and Dorset—our in-house plasterers at Hallmoore Developments usually average 2-3 days per room for a skim coat.
If we're talking about a whole-house skim over 100 square metres, our skilled in-house team can often get the job done in 5-7 working days, and that includes allowing for crucial drying time between coats.
How Long Plastering Jobs Take in Bournemouth
To give you a clearer picture for your property in Bournemouth, Highcliffe, or Southampton, we've broken down the timings for different jobs. Knowing these estimates helps you slot in the electricians, painters, and floor fitters without everyone tripping over each other. It’s natural to wonder how different trades compare; for instance, you might also be curious about how long other home improvement projects like vinyl flooring installation take.
This simple visual breaks down the time commitment, from a quick patch-up to a full-scale project.
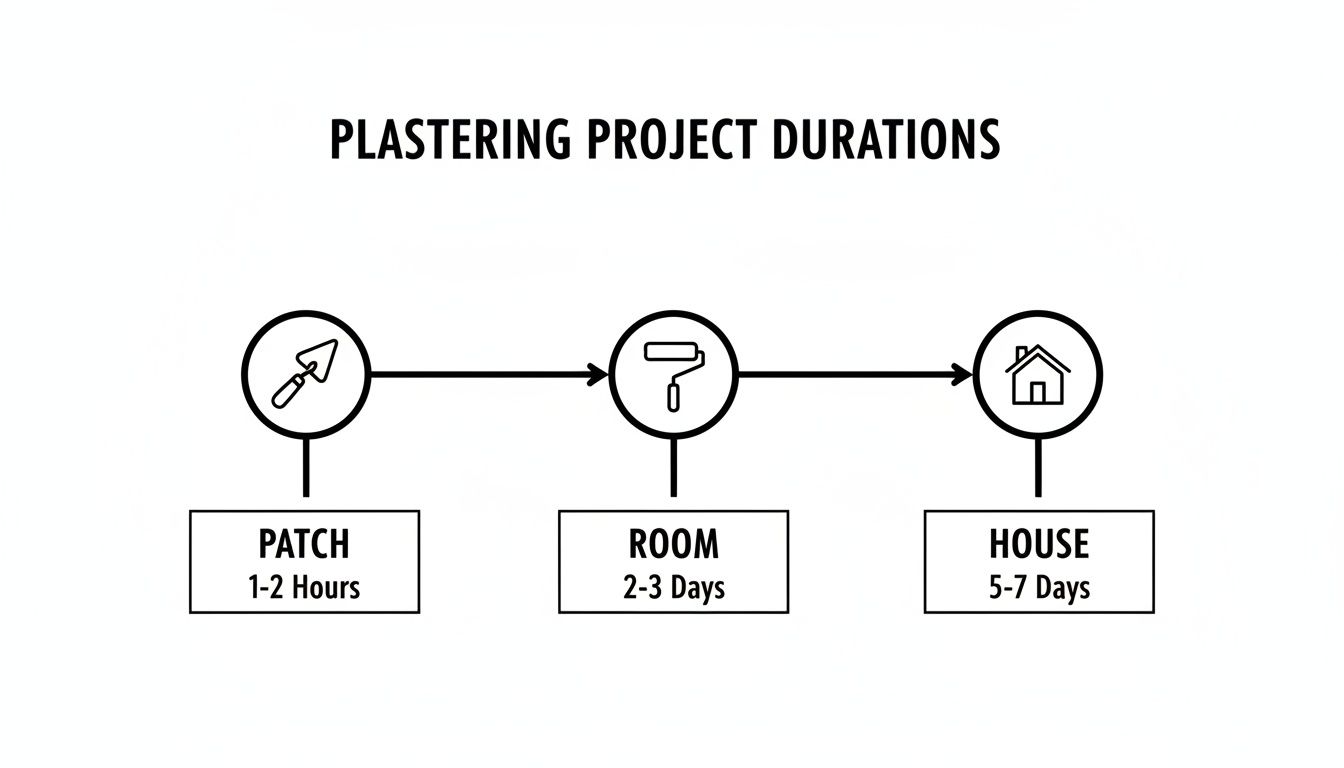
The main takeaway here is pretty clear: a minor repair in Ringwood might be done and dusted in an afternoon, but a full room or an entire house in Christchurch is a multi-day commitment.
Estimated Plastering Times for Common Jobs
To help you gauge the scope of your project, here’s a quick reference table. It breaks down the typical time our in-house service would expect to be on-site for the most common plastering jobs, not including the final drying and curing period.
Plastering Job | Average Time on Site (Excluding Drying) | Typical Scenario |
|---|---|---|
Small Patch Repair | 1–3 Hours | Repairing a hole from a removed fixture or minor wall damage. |
Skimming One Wall | 3–5 Hours | Applying a finish coat to a single wall in good condition. |
Skimming an Average Room | 1–2 Days | Skimming all walls and the ceiling in a 4m x 4m room. |
Full Plaster (Three Coats) | 3–4 Days | Applying scratch, float, and skim coats to bare brickwork in a room. |
As you can see, the difference between a simple skim and a full, back-to-brick plaster job is significant. This is why a proper assessment from our in-house service is always the best first step.
The Hidden Steps in a Professional Plastering Job
To really get to grips with "how long does plastering take," you have to look beyond the simple act of spreading plaster on a wall. A professional finish—the kind our in-house experts deliver across Bournemouth and Poole every day—is built on a foundation of critical, often unseen, steps. Each stage is non-negotiable for a flawless result that lasts.
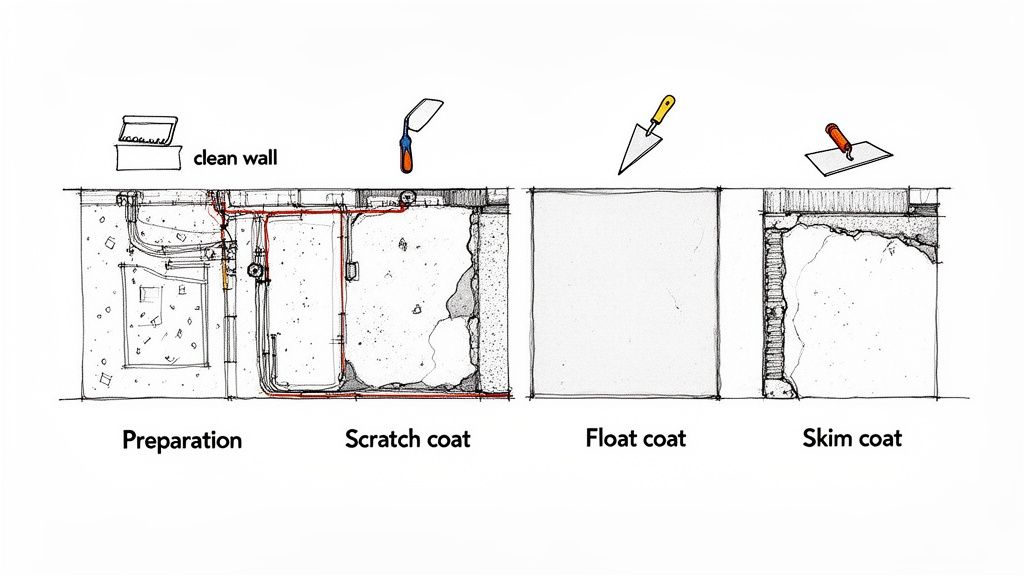
The whole process kicks off with meticulous preparation. This isn't just a quick dust-down; it's the absolute bedrock of the entire job. Cutting corners here is the fastest way to a failed finish, with problems like peeling or cracking showing up months down the line.
Laying the Groundwork for a Perfect Finish
Before a single bag of plaster is even opened, our teams in Christchurch get to work creating the ideal canvas. This initial stage can easily eat up a good chunk of the first day and involves several key tasks.
Stripping and Cleaning: All old wallpaper, flaky paint, and loose bits have to go. The walls are then thoroughly washed down to get rid of any grease or dust that could stop the new plaster from sticking properly.
Repairs and Chasing: Any cracks or holes in the wall are properly filled and made good. If you're having new wiring or pipes fitted, our in-house service will chase channels into the wall—it's a dusty job, but it's essential for that seamless, flat look.
Surface Keying: For super smooth or painted surfaces, the wall might need to be scored or painted with a special bonding agent. This creates a "key," giving the first layer of plaster something to really grip onto.
For a deep dive into this crucial first phase, our in-house service can provide all the information you need. Our professional teams do this before they even think about mixing plaster.
Building the Layers for Uneven Surfaces
For bare brickwork or really uneven walls, like you find in many older properties around Southampton and Ringwood, a single skim coat just won't cut it. In these cases, our in-house service uses a process of building up layers, which adds a fair bit of time to the job.
A breathable structure is one that allows moisture to pass through it, preventing water from getting trapped inside the wall. That's why using the right layers, especially in older homes, is so vital for long-term wall health and keeping damp at bay.
First, a scratch coat is applied directly to the brick or blockwork. We then literally scratch this first layer with a comb to create a rough, keyed surface for the next coat to bond to. This needs time to firm up before we can move on.
Next up is the float coat, sometimes called the brown coat. This is applied to flatten the surface and build it out to the right level. It's this layer that works the magic and straightens out those wonky walls.
Finally, the skim coat goes on. This is the thin, finishing layer that creates that glass-smooth surface you're after, ready for painting. Each of these layers requires a skilled hand, time, and a specific setting period before the next can begin. And of course, a professional job isn't just about the plaster; it's about safety too, including understanding things like Australian Personal Protective Equipment Requirements to keep the crew safe and the work top-notch.
What Really Dictates Your Plastering Timeline?
Ever wonder why a simple skim in a Highcliffe flat takes just a day, but a similar-sized room in a Ringwood cottage stretches over a week? It's a common question, and the answer goes far beyond just square footage. Several critical factors work together to shape how long plastering will take, and understanding them is key to setting realistic expectations for your project.
Of course, the size of the area is the most obvious starting point. A large living room with high ceilings in Southampton will naturally take longer and require more materials than a small box room in Poole. But that's just the beginning of the story.
The Condition of Your Walls
The state of the underlying surface—what we plasterers call the substrate—is arguably the single biggest influence on the timeline. Are we looking at fresh, modern plasterboard that's ready to go, or are we facing old, crumbling lath and plaster that needs stripping back to the timber?
Plasterboard (Drywall): This is the dream scenario. The surface is flat, stable, and usually just needs taping, jointing, and a final skim coat.
Existing Plaster: If the current plaster is solid, our in-house service can often skim right over it. But any loose or "blown" sections have to be hacked off and repaired first, which can add hours, or even a full day, to the job.
Bare Brickwork or Blockwork: This is the most time-intensive job. It requires a full wet plastering system with multiple coats (a scratch coat, a float coat, and then a skim), extending the timeline by several days to allow for proper drying between layers.
Think of it like getting a car resprayed. You can't just slap a new coat of paint over rust and dents. The real work is in the prep—stripping it back, filling the imperfections, and sanding it smooth. Walls are no different; the better the starting point, the faster the finish.
Room Complexity and Access
Not all rooms are simple, flat boxes. A straightforward space in Christchurch with four plain walls is one thing, but as soon as you add architectural features, the clock starts to tick a lot slower.
The complexity of a room—from awkward alcoves to intricate ceiling details—can add anywhere from 25% to 50% more time to a standard plastering job. This is where the skill of an experienced plasterer from our in-house service truly shows.
Elements that add significant time include:
Windows and Doors: Every single one needs to be carefully and precisely cut around. It’s slow, methodical work.
Alcoves and Chimney Breasts: These features introduce multiple angles and surfaces that all need to be blended seamlessly.
Ceilings with Coving or Spotlights: Working around detailed cornices or on high ceilings is physically demanding and requires extra precision.
Finally, we have to consider the practicalities. A damp, cold property in winter will dramatically slow down drying times between coats. And it's not just the room itself. External factors can also play a part. For instance, dry lining an extension wall typically takes 1-2 days, but we've seen squeezed margins on imported materials extend jobs unexpectedly.
How Different Factors Adjust Plastering Time
To give you a clearer picture, this table shows how various elements can either speed up or slow down a project.
Influencing Factor | Potential to Shorten Timeline | Potential to Extend Timeline |
|---|---|---|
Wall Condition | Fresh, clean plasterboard ready for skimming. | Old, damaged plaster needing hacking off and repairs. |
Room Size | Small, standard-height room (e.g., box room). | Large open-plan space with high ceilings. |
Room Complexity | Simple, square room with no features. | Multiple windows, alcoves, or a chimney breast. |
Plaster System | A single skim coat over a sound surface. | A full three-coat system on bare brickwork. |
Access | Ground floor, clear room with easy parking. | Top-floor flat with no lift and limited access. |
Environment | Warm, well-ventilated room in summer. | Cold, damp property during a wet winter. |
As you can see, the final timeline is a blend of these different variables. The key is to have our professional in-house service assess the space properly to give you an accurate estimate.
The timeline is also closely linked to the overall price, and having a handle on both is crucial for budgeting. Our in-house service can provide a clear guide to the cost of plastering a room in the UK. By keeping all these factors in mind, you'll have a much more realistic idea of how long your plastering project will actually take from start to finish.
Not all plastering jobs are the same, and that difference has a massive impact on your project's schedule. To get a realistic idea of how long plastering will take, you first need to know if your walls are getting a quick skim coat or a full "wet" plastering system.
Getting this right from the start is key. It helps you avoid nasty surprises and lets you plan your renovation in Bournemouth or Poole with total confidence.
Think of it like sorting out a car's bodywork. If the panels are in good nick, a quick topcoat of paint is all it needs to look brand new. But if you're down to the bare metal, you’ll need primer and multiple base layers first. Plastering is no different – the state of the wall dictates the work involved.
What Is a Skim Coat?
A skim coat is a very thin, final layer of plaster that goes over an existing surface. It’s the go-to solution for cosmetic jobs, like smoothing over old, tired walls, covering up that dreaded Artex, or finishing off fresh plasterboard.
Because it’s just a single, fine application, it’s a quick job. Our in-house team could easily skim a standard 4x4 metre room in Christchurch in a single day. The whole point is to get a perfectly smooth, flat surface ready for painting, without all the heavy, time-consuming layers.
A skim coat is the finishing touch, the aesthetic part of the job that gives you that flawless surface. It’s perfect for walls that are already solid but just need a modern, fresh look.
This is why skimming is so popular with homeowners across Southampton and Ringwood who want to give a room a fast, effective facelift. For more information, our in-house service can explain what skimming in plastering involves.
When Is Full Plastering Needed?
Full "wet" plastering is a different beast entirely. It’s a much more involved, time-consuming process that our in-house service saves for bare brickwork, blockwork, or walls that are seriously uneven. This isn't just a cosmetic fix; it's proper construction, building a brand-new wall surface from the ground up.
This method is all about building up layers:
The Scratch Coat: This is the first coat, applied straight onto the brickwork. We then score it (or "scratch" it) to create a rough texture for the next layer to grip onto.
The Float Coat: Next up is a thicker layer that goes over the scratch coat. This is what builds up the depth and gets the wall truly level.
The Skim Coat: Finally, we apply that thin finishing layer to give it a perfectly smooth finish.
Each of these coats needs time to set before the next one can go on, which really stretches out the timeline. That same 4x4 metre room in Christchurch that took a single day to skim could easily take three times as long for a full three-coat plastering job. You’re not just refinishing a surface here—you’re creating a whole new one.
The Crucial Role of Drying and Curing Time
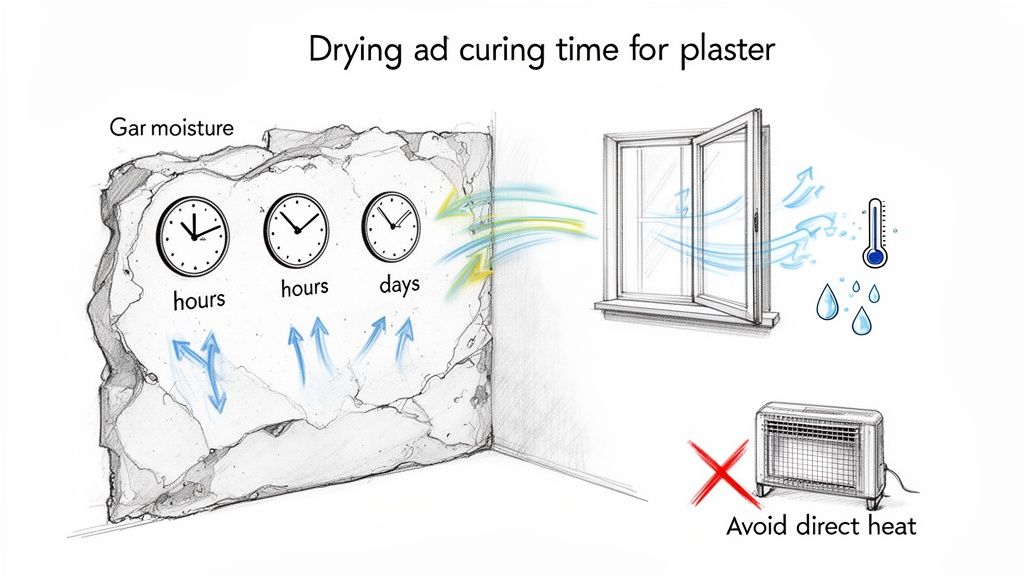
Once your plasterer from our in-house service packs up their tools for the day, their work is done, but your wall's journey has only just begun. The phase that follows—drying and curing—is arguably the most important and misunderstood part of the entire plastering timeline. Rushing this stage is the number one cause of paint peeling, cracking, and a ruined finish.
Many homeowners think that once the plaster is hard to the touch, it’s ready for paint. This is a critical mistake. Plaster goes through two distinct phases before it's truly ready, and understanding the difference is vital for knowing how long the whole job really takes.
Understanding Setting Versus Curing
First, let's look at setting. This is the initial chemical reaction where the plaster hardens. It happens within a few hours, leaving the surface firm enough to touch. Think of it like a cake just out of the oven—it has its shape, but it's still full of steam and needs to cool and settle completely.
Then comes the real test of patience: curing. This is the much longer process where all the excess water physically evaporates from the plaster. You’ll see the colour of the wall gradually change from a dark, patchy brown to a uniform, light pinkish colour. This can take anywhere from a few days for a thin skim coat to several weeks for a full three-coat system, especially in a damp property in Bournemouth during winter.
A freshly plastered wall can hold an astonishing amount of water. For an average-sized room, the plaster can contain over 100 litres of water that needs to escape. This is why patience and proper ventilation are non-negotiable.
How to Create Ideal Drying Conditions
Forcing the plaster to dry too quickly is just as bad as not letting it dry at all. Pointing fan heaters directly at the wall or cranking up a dehumidifier will suck the moisture out too fast, causing the surface to shrink and develop unsightly hairline cracks. Sometimes these aren't just cosmetic; they can be deep enough to need significant repairs. If you run into trouble, our in-house service can advise on how to repair cracked ceiling plaster.
The goal is to create gentle, consistent airflow. The best method is simple and free:
Promote Natural Ventilation: Open windows on opposite sides of the room to create a steady cross-breeze. This allows the moisture-heavy air to escape and be replaced with fresh, drier air.
Avoid Direct Heat: Keep your central heating on a low, ambient setting. Sudden bursts of high heat will cause more harm than good.
Be Patient: A skim coat might be ready for a mist coat of paint in 5-7 days, but thicker plaster jobs in older Ringwood or Christchurch homes could easily need 3-4 weeks or more to fully cure.
Understanding this waiting game is key to achieving the durable, high-quality finish our in-house teams at Hallmoore Developments deliver every time. Rushing this final step undoes all the skilled work that came before it.
Why Our In-House Plastering Services Make All the Difference
If you've ever managed a renovation in Hampshire or Dorset, you'll know the biggest headache is trying to line up different trades. A small delay from an electrician can push the plasterer back, which then holds up the decorator. It’s a frustrating domino effect. This is precisely where having an integrated, in-house team turns a stressful juggle into a smooth, streamlined process.
At Hallmoore Developments, our in-house service is built to eliminate these common delays. Our expert plasterers work shoulder-to-shoulder with our own trusted plumbers, electricians, and decorators. What this means for you is that when a wall in your Christchurch home is ready, the next trade is already briefed and ready to go. No gaps, no waiting, just a seamless workflow.
A Single Point of Contact for Your Project
For our clients in Poole, Ringwood, and Southampton, this approach means you get one single point of contact and a timeline you can actually rely on. Everything is managed under one roof, making sure your project moves efficiently from the first skim coat to the final brush stroke. There’s no finger-pointing between separate contractors and no crossed wires—just consistent quality and total accountability.
By managing all trades in-house, we often shrink the overall project timeline by up to 20%. That’s because scheduling is optimised from the start, and we spot and solve potential issues long before they become delays.
This joined-up system is vital when you're thinking about how long does plastering take as one part of a much bigger renovation. The plastering itself might be quick, but its place in the overall schedule is what truly counts.
Our in-house service ensures every stage is perfectly synchronised. Whether we're chasing out walls for new wiring or preparing the final surface for our painters, we deliver your transformed space with precision and care. If a smoother renovation experience sounds good to you, our in-house service can provide a transparent plastering quotation for your project and see how our service can make it happen.
Got Questions About Plastering? We've Got Answers
We get a lot of similar questions from homeowners across Highcliffe and Bournemouth before we start a job. It's completely understandable – you want to know what to expect. Here are a few of the most common queries our in-house service answers, helping you get your head around the process.
How Soon Can I Get the Paint Brushes Out?
This is easily the number one question we're asked! The honest answer is: you need to be patient. Before you even think about applying your final colour, the plaster has to be bone dry.
A simple skim coat will typically need about 5-7 days to dry out properly. But if our in-house service has done a full wet plastering job (like a scratch and brown coat system), you could be looking at 2-4 weeks, maybe even longer. It really depends on the airflow in your Ringwood home.
Once it's dry, don't just slap on your chosen colour. You absolutely must apply a "mist coat" first. This is just a watered-down emulsion paint that soaks into the new plaster, sealing it. If you skip this step, the final coat won't bond properly and will likely peel off down the line.
Can I Stick a Dehumidifier in the Room to Speed Things Up?
It’s tempting, I know, but please don't. Using dehumidifiers or cranking up the heating to force the plaster to dry is a recipe for disaster. It pulls the moisture out far too quickly, which can cause the plaster to shrink and crack.
The secret to a perfect, long-lasting finish is simply giving it time. The best thing you can do is create a gentle, steady airflow. Just crack open windows on opposite sides of the room. It’s the safest and most reliable way to let the plaster cure properly.
Is Plastering a Ceiling a Bigger Job Than the Walls?
Yes, almost every time. Plastering a ceiling in a Poole or Southampton property will take longer than doing the walls, even if the area is the same. It's a much more physically demanding and tricky task for our in-house team.
Think about it – our plasterers are working completely against gravity. It takes a huge amount of skill and effort to get that perfectly flat, smooth finish above your head. If you have light fittings, complex angles, or decorative coving, that will add even more time to the job and affect how long the plastering will take overall.
For a professional eye and a clear, no-nonsense timeline for your project, it pays to trust the experts. The in-house team at Hallmoore developments handles everything from the initial prep to that flawless final finish, making the whole process seamless.
Comments