.png)
Renovating a House Checklist: 10 Essential Steps for 2025
- Dan Hall
- Aug 13, 2025
- 19 min read

Embarking on a house renovation is one of the most exciting projects a homeowner can undertake, but its success hinges on meticulous planning and execution. Without a clear, structured roadmap, what should be a dream transformation can quickly devolve into a stressful ordeal of missed deadlines, unforeseen complications, and spiralling costs. A well-organised project is the foundation of a successful outcome, preventing minor oversights from becoming major setbacks. This is where a detailed checklist becomes an indispensable tool, acting as your guide from the first sketch to the final coat of paint.
This comprehensive renovating a house checklist is designed to provide that essential framework. We will guide you through every critical stage, breaking down the entire process into ten manageable, actionable steps. You will learn how to set a robust budget with a vital contingency fund, navigate the complexities of council permits, and secure qualified professionals for the job. We'll cover everything from creating a realistic timeline and addressing foundational safety issues first, to selecting materials and ensuring the correct insurance is in place.
Think of this as your project blueprint. Following these steps will not only keep your renovation organised and on track but also empower you to make informed decisions with confidence. To bring your vision to life with certified expertise and seamless project management, remember that our in-house teams are here to see to every detail. We specialise in a full spectrum of services, from initial design and structural work to certified Gas Safe plumbing and final decorating, ensuring your project is completed to the highest standard. Let’s get started on building your dream home, the right way.
1. Set a Realistic Budget and Include 20% Contingency
Before a single wall comes down or a tin of paint is opened, your most critical task is to establish a comprehensive and realistic budget. This is the financial foundation of your entire project and the most powerful tool you have for maintaining control. A well-structured budget goes beyond just the obvious costs; it’s a detailed forecast that accounts for every foreseeable expense, making it an essential first step in any successful renovating a house checklist.

The single most important part of this process is including a contingency fund. This is a non-negotiable buffer, typically 15-20% of your total project cost, set aside specifically for unforeseen issues. For example, a kitchen renovation budgeted at £40,000 should have an additional £8,000 contingency. This buffer could cover unexpected problems like discovering rotten joists or needing to rewire a circuit, preventing financial panic and project delays.
Actionable Budgeting Tips:
Gather Multiple Quotes: Never accept the first estimate. Obtain at least three detailed, itemised quotes from qualified contractors to get a clear market-rate benchmark for labour and services.
Research Material Costs: Don't rely solely on contractor estimates for materials. Do your own research to understand the costs of tiles, flooring, fixtures, and finishes. This empowers you to have informed conversations and spot any over-inflated figures.
Track Everything: Use a spreadsheet or a budgeting app to track every single expense weekly. This disciplined approach helps you identify "budget creep" early and make necessary adjustments before it gets out of hand.
Organise All Paperwork: Keep a dedicated folder for all receipts, invoices, and contracts. This is vital for managing warranties, potential VAT reclaims on eligible work, and resolving any disputes.
Key Insight: Your budget isn't just a number; it's a dynamic plan. It dictates the scope of your work, the quality of materials you can afford, and ultimately, the project's success.
For bespoke budgeting advice tailored to your project's scope, our in-house financial planners at Hallmoore Developments can provide a detailed cost analysis to see to your peace of mind. A detailed breakdown can help you understand exactly where your money is going.
2. Obtain All Necessary Permits Before Starting Work
After finalising your budget, the next non-negotiable step is to secure all required permissions from your local council. Overlooking this legal requirement is a costly mistake that can lead to significant fines, orders to undo completed work, and serious complications when you eventually sell your property. Obtaining the correct permits ensures your renovation complies with UK building regulations and safety standards, a crucial part of any renovating a house checklist.

Many homeowners mistakenly believe permits are only for major extensions. However, even internal alterations often require approval. For example, a bathroom renovation involving the relocation of a toilet or soil pipe needs a building regulations application to ensure proper drainage and ventilation. Similarly, a kitchen remodel that includes adding new electrical circuits for an island or major appliances will require an electrical safety certificate from a qualified professional.
Actionable Permitting Tips:
Apply Well in Advance: The planning and building control process can be slow. Submit your applications at least 4-6 weeks before your planned start date to avoid holding up your entire project timeline.
Confirm Contractor Credentials: Ensure your chosen contractor is appropriately licensed and insured. A reputable builder will be able to advise on the permits needed and can often handle the application process on your behalf.
Keep Documents On-Site: Once approved, keep a copy of the permits and approved plans clearly visible on the construction site. This is often a requirement for council inspector visits.
Schedule Inspections Promptly: You will need to arrange for council inspectors to visit at key stages of the build. Schedule these appointments in advance to prevent your contractors from being stuck waiting for an inspection before they can proceed.
Key Insight: A building permit isn't just bureaucratic red tape; it's an independent verification that your renovation work is safe, structurally sound, and compliant with national standards, protecting your investment for years to come.
Navigating the complexities of local council planning and building control can be daunting. The team at Hallmoore Developments has extensive experience in managing permit applications and ensuring all work is fully compliant. We use our in-house services to handle this critical step for you, guaranteeing your project proceeds smoothly and legally.
3. Hire Licensed and Insured Contractors
Choosing the right professionals is arguably as important as setting the budget. The quality of your renovation, your legal protection, and your overall peace of mind rest on the shoulders of your build team. Hiring licensed and insured contractors is a non-negotiable step in your renovating a house checklist, safeguarding your project from poor workmanship and financial liability. A licensed professional has proven their competency to a governing body, while insurance protects you if things go wrong.

This protection is invaluable in real-world scenarios. For example, an insured contractor who accidentally breaks a water line is responsible for covering the cost of the damage, saving you from a devastating and unexpected expense. Similarly, a certified Gas Safe engineer is legally qualified to work on your boiler, ensuring the installation is safe and compliant. Using unqualified individuals not only risks your family’s safety but can also invalidate your home insurance.
Actionable Hiring Tips:
Verify Credentials: Do not take a contractor's word for it. For specialised work, check for registrations with competent person schemes like Gas Safe for gas work or NICEIC for electrics. You can usually verify these credentials online.
Request Proof of Insurance: Ask for a copy of their public liability and professional indemnity insurance certificates. You can even contact the insurance provider directly to confirm the policy is current and provides adequate coverage for your project's scale.
Check References and Reviews: Go beyond curated testimonials. Ask for contact details of recent clients and look for independent reviews on platforms like Checkatrade or the Federation of Master Builders (FMB).
Insist on a Detailed Contract: Your contract should meticulously outline the scope of work, payment schedule, timeline, and a clear procedure for handling changes or disputes. This document is your primary legal protection.
Key Insight: The cheapest quote is often the most expensive in the long run. Investing in qualified, insured professionals is an investment in quality, safety, and a stress-free renovation process.
At Hallmoore Developments, all our tradespeople are fully licensed, insured, and vetted to the highest industry standards. Our in-house services can manage the entire process, providing a single point of contact and guaranteeing that every aspect of your project is seen to by a qualified expert.
4. Create a Detailed Timeline with Built-in Flexibility
Just as a budget governs your finances, a detailed timeline governs your project's momentum and coordination. It’s the master plan that synchronises every moving part, from material deliveries and subcontractor arrivals to inspections. Creating this schedule is a cornerstone of a successful renovating a house checklist, preventing the chaos of having tilers show up before the plumbing is even roughed in.
This visual roadmap helps you anticipate what’s next and ensures a logical sequence of work. For instance, in a kitchen remodel, the timeline dictates that cabinet installation must happen before the final countertop templating, as the templates are based on the exact placement of the base units. A well-planned timeline prevents these critical dependencies from causing costly delays and rework.
The timeline below illustrates key milestones in a typical renovation, showing how different stages have varying durations that must be accounted for.
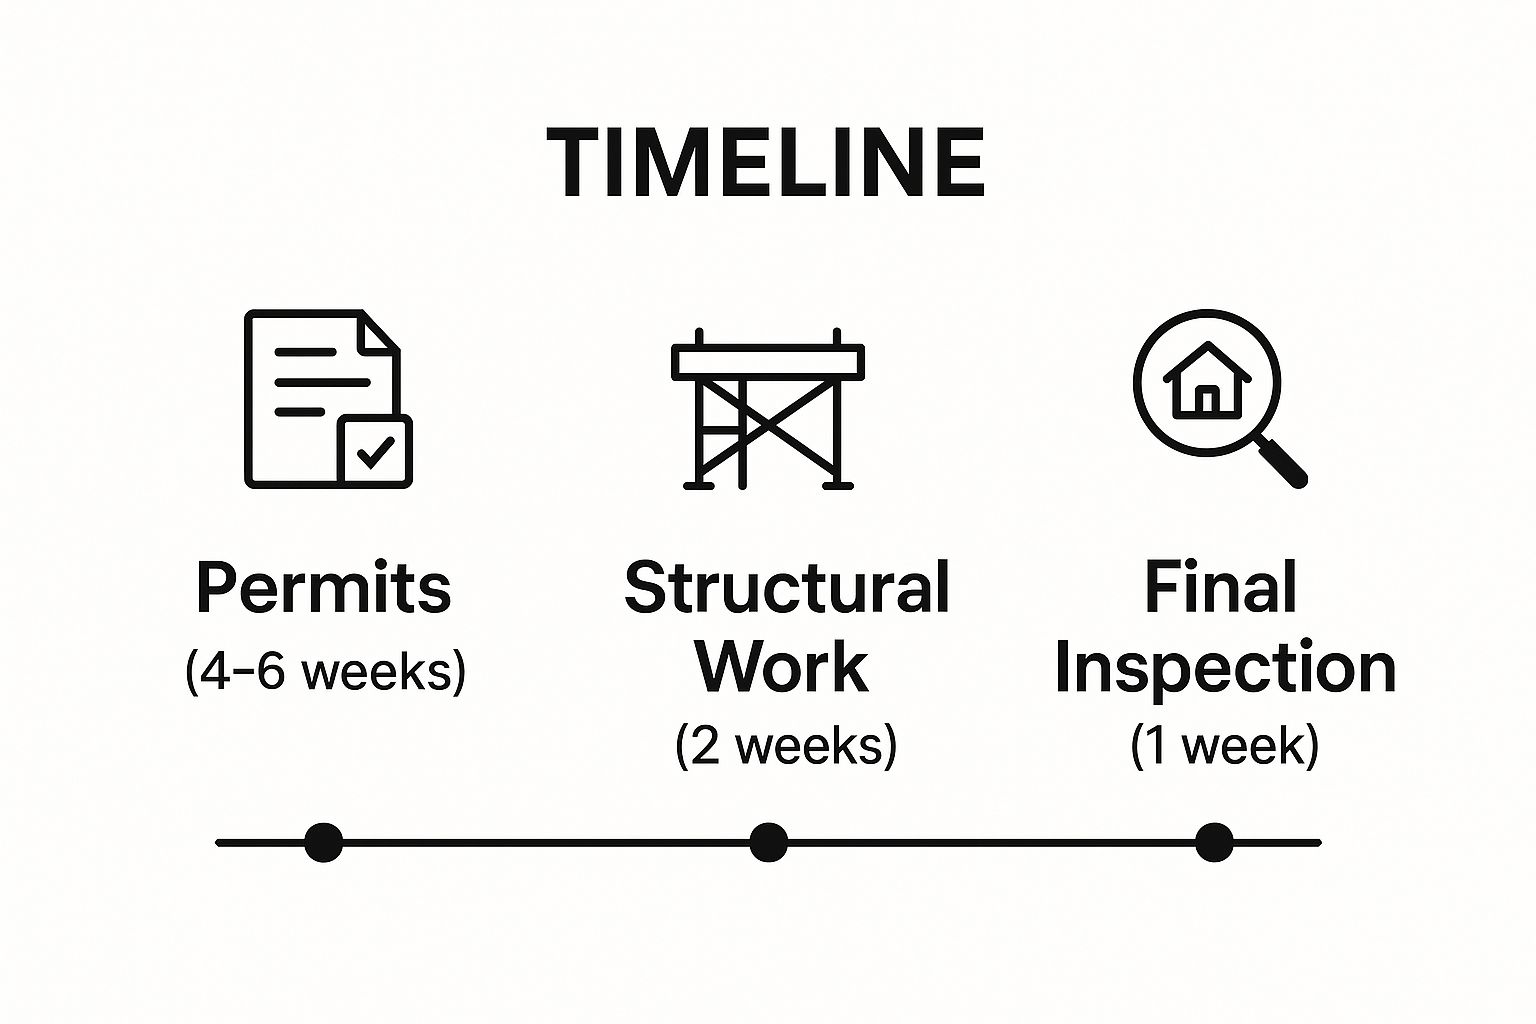
As the infographic highlights, administrative tasks like securing permits can take significantly longer than some construction phases, making it crucial to plan for these early on.
Actionable Timeline Tips:
Order Long-Lead-Time Items First: Custom windows, bespoke cabinetry, or special-order tiles can have lead times of several weeks or even months. Order these items as soon as your plans are finalised to ensure they arrive when needed, not after.
Add a Generous Buffer: Never rely on the best-case-scenario timeline provided by contractors. A smart rule of thumb is to add a 20-25% buffer to their estimates to account for weather, supply chain issues, or unexpected problems.
Create Weather Contingencies: For any external work like extensions, roofing, or landscaping, have an alternative plan for what internal tasks can be progressed if the weather turns. This keeps the project moving forward, rain or shine.
Communicate Immediately: The moment a delay occurs, communicate it to all affected parties. Informing your electrician that the plastering is a week behind allows them to adjust their schedule without wasting a site visit.
Key Insight: Your timeline is not a rigid decree but a flexible guide. Its purpose is to impose order and sequence, but its real value lies in its ability to adapt to the realities of a complex renovation project.
For expert help in creating a project schedule that balances ambition with reality, our project managers at Hallmoore Developments can craft a detailed timeline specific to your renovation. Our in-house services ensure every dependency is considered, giving you a clear path to see you through from start to finish.
5. Plan for Temporary Living Arrangements
A major renovation isn’t just about construction; it’s a significant disruption to your daily life. Underestimating the impact of living amidst dust, noise, and upheaval is a common mistake that can lead to immense stress. Planning for temporary living arrangements is a crucial step in any renovating a house checklist, ensuring you and your family can maintain a sense of normality.
How you manage this depends on the scale of the work. For a kitchen remodel, this could mean setting up a temporary kitchenette in the basement or dining room with a microwave, slow cooker, and a small fridge. For a major project involving bathrooms and bedrooms, you might need to consider staying with relatives or finding a short-term rental. The key is to prepare for the loss of essential facilities before they become unavailable.
Actionable Tips for Temporary Living:
Establish a 'Clean Zone': Designate one or more rooms as strictly off-limits to construction traffic and dust. Use plastic sheeting to seal doorways and invest in good-quality air purifiers to maintain air quality in this sanctuary.
Set Up a Temporary Kitchen First: Before demolition begins, move your essential small appliances (kettle, toaster, microwave) to your designated temporary cooking area. Stock up on disposable plates and cutlery to avoid washing up in a bathroom sink.
Plan Your Meals: Think about meals that require minimal preparation and cooking. This is the time for slow cookers, pre-made salads, and simple one-pot dishes. This small bit of planning can drastically reduce daily stress.
Protect Your Belongings: Move furniture and valuables far away from the work zone or cover them meticulously with heavy-duty dust sheets. Construction dust is invasive and can damage electronics and soft furnishings.
Key Insight: Your goal is to minimise daily friction. A well-thought-out temporary living plan isn't a luxury; it's a strategic move to protect your well-being and keep the project moving forward without the strain of a chaotic home life.
Managing the disruption is as important as managing the build itself. For comprehensive project management that includes planning for these logistical challenges, our in-house services at Hallmoore Developments can help create a seamless renovation experience from start to finish.
6. Address Structural and Safety Issues First
Before you can even dream of paint colours or kitchen layouts, you must prioritise the health and safety of your home's core structure. Addressing foundational, framing, electrical, and plumbing issues first is a non-negotiable step. This 'bones-before-beauty' approach ensures the long-term safety of your property, prevents future damage, and crucially, avoids having to rip out expensive new finishes to fix a problem that should have been solved at the start. It is a fundamental part of any diligent renovating a house checklist.
Tackling these hidden systems is about future-proofing your investment. For instance, discovering and replacing outdated knob-and-tube wiring before you plaster and paint is infinitely less costly and disruptive than addressing it after a fault occurs. Similarly, rectifying foundation subsidence or repairing rotten roof trusses before installing new flooring or ceilings prevents catastrophic and expensive rework down the line.
Actionable Safety & Structural Tips:
Engage a Structural Engineer: If your plans involve removing or altering any walls, it is essential to hire a qualified structural engineer to assess load-bearing requirements. This is not a corner you can afford to cut.
Update Electrics to Current Standards: Don’t just meet the minimum requirements. Our certified electricians can upgrade your consumer unit, ensure correct earthing, and install systems that meet modern safety standards, including Arc Fault Circuit Interrupters (AFCIs).
Consider Whole-House Surge Protection: During a major electrical overhaul, installing a whole-house surge protector at your consumer unit is a wise and relatively low-cost addition. This protects all your valuable electronic devices from power surges.
Document Everything: Before any walls are closed up, take detailed photographs and videos of all new wiring, plumbing, and structural repairs. This documentation is invaluable for future maintenance, inspections, and troubleshooting.
Key Insight: The work you do on your home's structure and core systems is the most important part of the renovation, even if it’s invisible at the end. It’s the foundation upon which all cosmetic success is built.
To ensure your property is safe, compliant, and structurally sound, our team at Hallmoore Developments includes certified Gas Safe engineers and NICEIC-approved electricians who can conduct a thorough assessment. Our in-house services can identify and rectify any underlying issues, providing you with a safe and secure canvas to see your renovation dreams through to completion.
7. Select Materials and Finishes Early in the Planning Phase
One of the most common sources of project delays and budget overruns is late material selection. Choosing your fixtures, fittings, and finishes early in the planning process is a strategic move that provides clarity for your entire team and timeline. This decision-making step is a crucial part of any renovating a house checklist, as it directly influences everything from plumbing placement to electrical layouts and contractor scheduling.
Making these choices upfront ensures materials are ordered and available exactly when they are needed for installation. For example, bespoke kitchen cabinetry or imported tiles often have lead times of 8-12 weeks. If you wait until the space is ready for them, you introduce a significant and costly pause into the workflow. Similarly, selecting your exact shower valve and basin taps before the first-fix plumbing allows the plumber to set pipework with precision, avoiding expensive adjustments later.
Actionable Material Selection Tips:
Order Samples: Never finalise a choice based on a screen or a catalogue. Order physical samples of tiles, flooring, paint, and fabrics. View them in your home's actual lighting at different times of day to ensure the colour and texture are exactly what you envision.
Buy 10-15% Extra: Always order a surplus of key materials like tiles and flooring. This "attic stock" is invaluable for future repairs, guaranteeing you have a perfect match for any chips or replacements needed years down the line.
Coordinate Deliveries: Work closely with your project manager to schedule deliveries just-in-time. Having materials arrive too early creates storage problems and clutter on-site, while late arrivals halt progress. A well-managed delivery schedule is a sign of an organised project.
Measure Twice, Order Once: This is especially critical for custom-made items like worktops, windows, or fitted wardrobes. Confirm all measurements with your contractor before placing an order to prevent costly errors that cannot be returned.
Key Insight: Early material selection transforms your design from an abstract idea into a concrete plan. It locks in costs, defines the construction schedule, and removes guesswork for your tradespeople.
Our design consultants at Hallmoore Developments use our in-house services to help guide you through the selection process. We see to it that your choices align with both your aesthetic vision and project timeline.
8. Ensure Proper Insurance Coverage Throughout Project
Before any physical work begins, you must address the significant risks that a renovation introduces to your property. Standard home insurance policies often do not cover properties undergoing major structural changes or where work is being carried out by contractors. This is a critical step in your renovating a house checklist, as failing to secure the right cover could leave you financially exposed to catastrophic events like fire, theft, or liability claims.
This isn't about simply informing your current provider; it's about arranging specialist renovation insurance. For instance, if new wiring work caused a fire that damaged the original structure and all the new materials on-site, a standard policy might deny the claim. A dedicated renovation or builder's risk policy is designed to cover the existing structure, the new works, materials, and public liability, ensuring you are protected against the unique hazards of a building site.
Actionable Insurance Tips:
Inform Your Insurer Immediately: Before starting any work, contact your current home insurance provider. They will advise if your existing policy can be amended or if you need to take out a specialist renovation insurance policy.
Verify Contractor Insurance: Always ask for and verify a copy of your contractor’s public liability insurance certificate. Ensure it is current and provides adequate cover (typically at least £2-5 million) for the scale of your project. This protects you if they cause damage to your or a neighbour’s property.
Document Property Condition: Take extensive photos and videos of your property, including adjacent areas, before work commences. This creates a clear "before" record that is invaluable in the event of a damage claim.
Understand What's Covered: Read the policy details carefully. Does it cover materials left on-site? What about tools and equipment? Is legal expenses cover included? Knowing the specifics prevents nasty surprises if you need to make a claim.
Key Insight: Standard home insurance is designed for a finished, occupied home, not a worksite. Renovation insurance is specifically structured to manage the increased risks of theft, damage, and injury inherent in a construction environment.
Navigating the complexities of renovation insurance can be daunting. The team at Hallmoore Developments can guide you on the necessary cover for your specific project. Our in-house services ensure all contractors we engage hold the required insurance, so you have complete peace of mind.
9. Plan Electrical and Plumbing Updates Strategically
The systems hidden behind your walls, like electrics and plumbing, are the lifeblood of a modern home. Failing to update them during a major renovation is one of the most significant missed opportunities, often leading to costly and disruptive retrofitting later. Strategically planning these updates is a non-negotiable part of any serious renovating a house checklist, ensuring your home is safe, functional, and future-proof.
When walls and floors are already open, accessing these core systems is exponentially easier and more cost-effective. For instance, while renovating your kitchen, upgrading your electrical service from a dated 100-amp to a modern 200-amp service provides the capacity for high-demand appliances. Similarly, replacing old, corroded galvanised pipes with durable PEX or copper during a bathroom remodel prevents future leaks and improves water pressure throughout the house.
Actionable Electrical and Plumbing Tips:
Plan for Future Demands: Don't just plan for your current needs. Aim to install 20% more electrical capacity than you currently require to accommodate future technology, such as smart home devices or an electric vehicle (EV) charging point.
Prioritise Safety Upgrades: Ask your electrician to install a whole-house surge protector to safeguard your expensive electronics. Ensure all new circuits are protected by RCDs (Residual Current Devices) for enhanced safety, a standard requirement in modern wiring regulations.
Consolidate Plumbing Work: If you are remodelling a bathroom or kitchen, it's the ideal time to assess and update any nearby plumbing. This approach minimises disruption and is far more economical than addressing issues piecemeal.
Map Everything Out: Create a detailed map or plan of all new wiring and pipe runs before the walls are closed up. This documentation is invaluable for future maintenance, troubleshooting, or further renovations.
Key Insight: Proactive updates to your electrical and plumbing systems are an investment in your home’s safety, functionality, and long-term value. Addressing them during a renovation saves money and prevents major headaches down the line.
Our certified Gas Safe engineers and qualified electricians at Hallmoore Developments use our in-house services to conduct a thorough assessment of your existing systems and integrate necessary upgrades seamlessly into your project plan. For more detailed advice on system upgrades, you can explore our ultimate guide to plumbing services.
10. Document Everything Throughout the Process
Throughout the chaos of demolition and the excitement of construction, meticulous documentation can feel like a low-priority task. However, it is one of the most crucial steps in any renovating a house checklist, serving as your project’s official record. This process protects your investment, simplifies future maintenance, and provides indisputable evidence for insurance or warranty claims.
Comprehensive documentation goes far beyond just keeping receipts. It involves creating a complete history of your renovation. For example, taking photos of pipework and wiring layouts before the plasterboard goes up can be invaluable years later when you need to hang a picture or undertake further work. Similarly, having a digital copy of an appliance receipt and its warranty can turn a stressful breakdown into a straightforward replacement claim.
Actionable Documentation Tips:
Take Progress Photos: Capture daily or weekly photos from the same angles. This creates a visual timeline of the work, which is powerful evidence of what was completed, when it was done, and the quality of installation before it was concealed.
Digitise All Paperwork: Scan or photograph every permit, contract, invoice, and warranty document. Organise these digital files in a cloud-based folder (like Google Drive or Dropbox) labelled by room or contractor for instant access from anywhere.
Keep a Renovation Journal: Maintain a simple log, either in a notebook or a digital document. Note key decisions, dates of conversations with contractors, unexpected changes, and delivery dates. This journal can clarify disputes and keep everyone accountable.
Organise by Trade: Create separate physical and digital folders for each trade (e.g., "Plumbing," "Electrics," "Joinery"). This makes it easy to find a specific contractor’s details or a relevant warranty without sifting through a mountain of paperwork.
Key Insight: Your documentation is the ultimate proof of quality and compliance. It is your project's memory, safeguarding you against future uncertainties and adding tangible value to your home.
At Hallmoore Developments, our project managers maintain exhaustive records for every job, ensuring our clients have a complete and organised history of their renovation. Our in-house services can help you set up your own documentation system, and we see to it that you have all the records you need.
Renovation Checklist: Top 10 Key Considerations Comparison
Item | Implementation Complexity 🔄 | Resource Requirements ⚡ | Expected Outcomes 📊 | Ideal Use Cases 💡 | Key Advantages ⭐ |
|---|---|---|---|---|---|
Set a Realistic Budget and Include 20% Contingency | Moderate – requires upfront research and planning | High – detailed cost estimates, tracking tools | Prevents funding shortfalls, better decision-making | Any renovation needing cost control and risk management | Reduces delays and stress, improves negotiations |
Obtain All Necessary Permits Before Starting Work | Moderate to High – detailed plans, inspections | Medium – time and permit fees | Ensures legal compliance, avoids fines and insurance issues | Structural, electrical, plumbing, HVAC renovations | Guarantees safety standards and legal protection |
Hire Licensed and Insured Contractors | Moderate – vetting, verifying credentials | High – typically higher labor costs | Quality workmanship, legal and financial protection | All projects requiring professional standards and liability coverage | Reduces risk of poor workmanship and liability |
Create Detailed Timeline with Built-in Flexibility | High – constant monitoring and adjustments | Medium – scheduling tools, communication | Efficient project flow, coordination of contractors | Complex renovations with multiple tasks and parties | Minimizes delays, improves contractor coordination |
Plan for Temporary Living Arrangements | Low to Moderate – planning and setup | Medium – temporary equipment and spaces | Maintains comfort and reduces disruption stress | Major renovations displacing normal living areas | Protects belongings, allows efficient work progression |
Address Structural and Safety Issues First | High – technical inspections and repairs | High – specialized labor and materials | Long-term safety, prevents costly future repairs | Renovations on older homes or with known damage | Improves home value, ensures building integrity |
Select Materials and Finishes Early in Planning Phase | Moderate – early decisions and coordination | Medium to High – purchasing, storage | Prevents delays, cost accuracy, cohesive design | Projects with custom or long-lead-time materials | Enables discounts, avoids last-minute changes |
Ensure Proper Insurance Coverage Throughout Project | Low to Moderate – obtaining and verifying policies | Medium – additional insurance costs | Protects against financial loss and liability | All renovations with property and liability risks | Covers damage, theft, injuries during construction |
Plan Electrical and Plumbing Updates Strategically | High – technical upgrades and code compliance | High – materials, skilled labor | Improved safety, increased home value, future-proofing | Older homes needing modern systems | Reduces maintenance, increases capacity and safety |
Document Everything Throughout the Process | Low to Moderate – consistent record-keeping | Low to Medium – cameras, storage, organization | Provides evidence, aids maintenance, supports claims | All renovation projects for accountability | Protects investment and enables tax benefits |
Completing Your Renovation and Enjoying Your New Home
The final coat of paint is dry, the last of the dust has settled, and the protective plastic has been peeled away from your new windows. You've navigated the complexities of budgets, navigated the maze of permits, and made countless decisions about everything from skirting boards to light switches. This journey, guided by a comprehensive renovating a house checklist, transforms what can be an overwhelming ordeal into a structured, manageable, and ultimately rewarding experience. Reaching this final stage is a testament to meticulous planning and perseverance. Now is the time to step back, admire your handiwork, and truly begin to enjoy the space you’ve worked so hard to create.
The transition from a construction site back to a home is a crucial final phase. It involves more than just moving the furniture back in; it's about methodically completing the project to ensure longevity, safety, and your complete satisfaction. This is where the final details, often overlooked in the rush to finish, make all the difference.
The Final Polish: Your Post-Renovation Walkthrough
Before you sign off on any final payments or officially declare the project complete, a detailed final walkthrough is non-negotiable. Arm yourself with your original project plans, your list of agreed-upon finishes, and a roll of painter's tape. Go through every room, every cupboard, and every corner with a critical eye.
Check the Finishes: Look for paint drips, scuffed walls, or imperfectly installed trim. Are the grout lines clean and consistent? Do the new floors meet the walls cleanly?
Test Everything: Don't just look; interact with your new space. Open and close every door and window. Turn on every tap and light switch. Test all new appliances and run them through a full cycle. Check that plug sockets are functional and correctly positioned.
Create a "Snagging List": Use the painter's tape to mark any imperfections or issues you find. Compile these into a final, consolidated "snagging list" for your contractor. A professional and reputable team will expect this and will have a process for rectifying these minor issues promptly.
Key Insight: A thorough snagging list is not about finding fault; it's about ensuring the quality you paid for is delivered. It is the last critical step in quality control and protects your investment for years to come. Our in-house teams at Hallmoore Developments see to every last detail, ensuring the finish is impeccable before we consider a project complete.
From Checklist to Lived-In Reality
Following a detailed renovating a house checklist is the single most valuable action you can take. It provides the framework for success, turning abstract goals into actionable steps. The most important takeaways from this process are not just about which nail to use where, but about the overarching principles of project management.
Planning is Paramount: The time spent planning before a single hammer is swung saves ten times the amount of time, money, and stress during the actual work.
Budget for Reality, Not Hope: The 20% contingency fund is not a 'nice-to-have'; it is an essential part of a realistic budget that accounts for the inevitable surprises hidden within walls and under floors.
Your Team is Your Greatest Asset: Hiring accredited, insured, and experienced professionals is the best decision you will make. Their expertise, from our Gas Safe certified plumbers to our master decorators, is what brings your vision to life safely and to the highest standard.
A successful renovation is a powerful accomplishment. It not only increases the financial value of your property but also profoundly enhances your quality of life. You've created a home that is tailored to your needs, reflects your style, and is built to last. The journey may be complex, but the reward-a beautiful, functional, and personal space-is immeasurable.
Embarking on a renovation is a significant undertaking, but you don't have to manage it alone. Hallmoore developments offers a complete, in-house solution, guiding you through every item on your renovating a house checklist with our team of certified experts. Our in-house services are here to see to your project from start to finish. To bring your vision to life with professionalism and care, contact Hallmoore developments today for a comprehensive consultation.
Comments