.png)
A DIY Guide on How to Smooth Textured Walls in Bournemouth
- Dan Hall
- Jan 18
- 13 min read

Learning how to smooth textured walls is a game-changer for your home's interior. It really boils down to two main approaches: either sanding the texture down or applying a thin skim coat over the top to create a perfectly flat surface. Whichever route you take, the process instantly updates a room, making it feel more modern and spacious. Our in-house service's team believes it's one of the most impactful upgrades a homeowner can make.
Why Smoothing Textured Walls Transforms Your Home in Bournemouth
If you own a property in Bournemouth or Highcliffe, you'll know what we're talking about. Those dated textured walls, common in houses built back in the 70s and 80s, are everywhere. Getting rid of that old Artex or 'popcorn' ceiling texture is one of the single best things you can do to modernise your living space. Smooth walls give you a clean, contemporary canvas that completely changes the feel of a room.
The visual impact is immediate. Smooth surfaces reflect light much more evenly, which makes any room—from a small hallway in Poole to a large living area in Southampton—feel significantly brighter and bigger. It’s a simple change that can make a cramped space feel open and airy.
Practical Benefits Beyond Aesthetics
It’s not just about looks; there are real practical advantages too. Smooth walls are far easier to clean and maintain than their textured cousins, which are magnets for dust and cobwebs. This is a huge plus for families or anyone dealing with allergies.
And when it comes to decorating, it’s a joy rather than a chore.
Painting: You can apply an even coat of paint without the frustration of trying to force a roller into every nook and cranny of a bumpy surface.
Wallpapering: Hanging wallpaper is nearly impossible on a rough wall. You absolutely need a smooth surface for proper adhesion and a professional finish.
Artwork: Pictures and other decor hang completely flush against the wall, creating that polished, gallery-like appearance everyone loves.
For homeowners in Ringwood and Christchurch, updating interior walls is a powerful way to boost your property's appeal. A smooth finish is often seen as a premium feature by potential buyers, signalling a well-maintained and modern home.
This project is more than just a cosmetic fix; it's a smart investment in your property. To learn more about how small changes can deliver big results, take a look at these high-impact projects to maximise your home's value. Our in-house service's team sees it all the time—this single update can transform a property's entire atmosphere.
Choosing Your Method: Skim, Sand, or Re-Board?
Before you even think about picking up a tool, you need a solid plan. The first job is to get a real sense of what you're up against. Are you dealing with a light 'orange peel' texture that’s fairly subtle, or are you facing down a more aggressive 'popcorn' or Artex finish?
For anyone with an older property, especially in areas like Christchurch or Poole, there's a critical safety step you simply cannot skip. Older textured coatings, particularly Artex applied before 2000, can contain asbestos. You absolutely must get this tested before you disturb the surface in any way. If asbestos is present, our in-house service's team strongly advises against any DIY removal—it's a job for certified professionals who can manage the situation safely.
Once you know exactly what your walls are made of, you can pick the right method for the job. Each approach comes with its own trade-offs in terms of cost, mess, time, and the skill needed to get it right.
Deciding Between Skim, Sand, or Re-Board
Sometimes, seeing the options laid out visually makes the decision easier. This flowchart breaks down the key things to consider when you're weighing up a DIY approach versus calling in the professionals from our in-house service's.
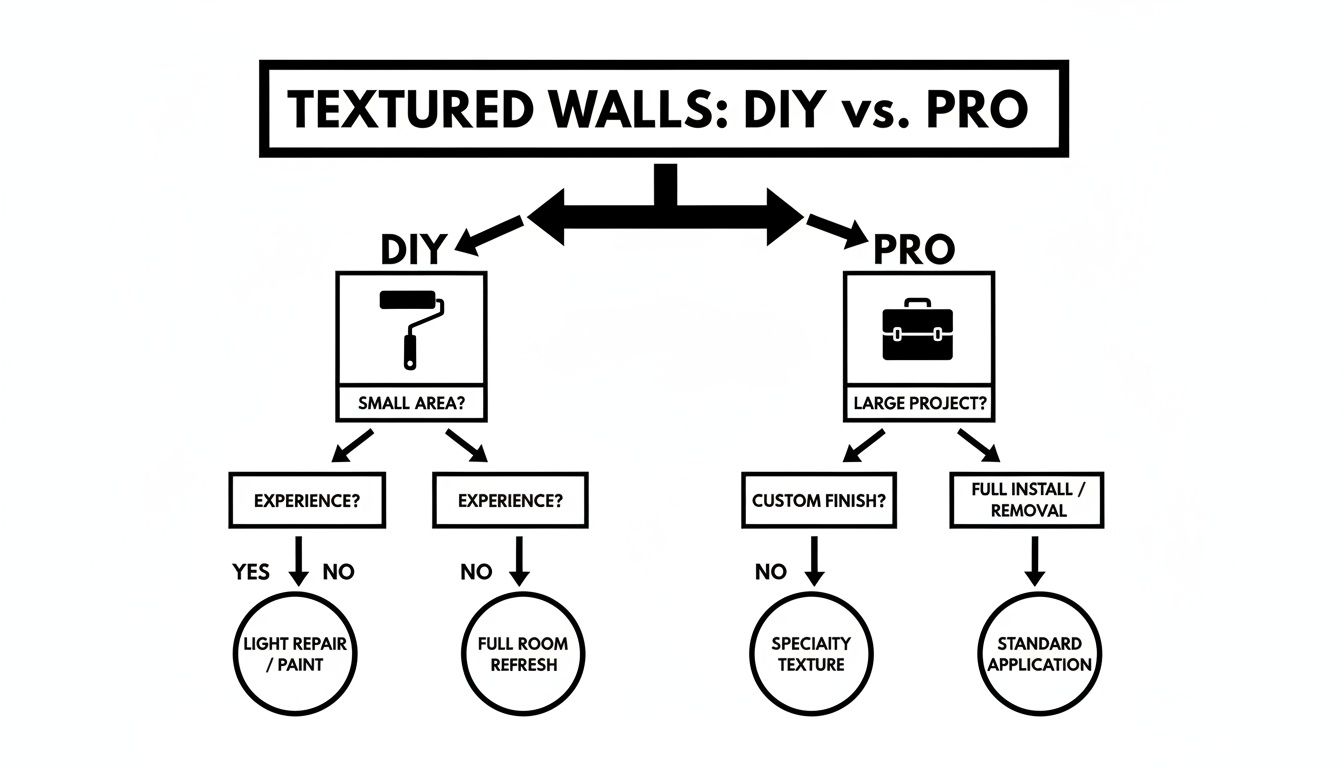
It’s a handy guide to help you see where a project's complexity or your desired quality of finish might make professional help from our in-house service's the more practical route.
Your Three Main Options Explained
Your choice will ultimately come down to the texture's depth and your own confidence in your DIY skills.
Sanding Down: This is really only an option for the lightest of textures, like a faint orange peel. Be warned: it's incredibly dusty work and demands serious protective gear—goggles, a high-quality respirator mask, the lot.
Skim Coating: This involves applying a thin layer (or sometimes a few) of joint compound or plaster over the existing texture. It's the most common and effective way to get that perfectly flat, modern finish everyone is after.
Re-Boarding (Overboarding): The most full-on approach, this means fixing new plasterboard directly over the old textured wall. It’s a guaranteed route to a perfect new surface, especially if the original walls are in rough shape or very uneven.
Comparing Wall Smoothing Methods
To help you weigh your options, here’s a side-by-side look at the three main approaches. This table breaks down the cost, skill, and mess involved with each one.
Method | Best For | DIY Cost | Skill Level Required | Mess Factor |
|---|---|---|---|---|
Sanding | Very light textures (e.g., orange peel) on a small scale. | Low (£50-£100) | Beginner | Very High |
Skim Coating | Most textures, from light to medium. The go-to professional method. | Medium (£150-£300) | Intermediate to Advanced | High |
Re-Boarding | Heavy textures, damaged walls, or when asbestos is present. | High (£300-£500+) | Advanced | Medium |
Ultimately, the best method depends on your specific walls and your willingness to take on the work.
In Dorset and Hampshire, where 25% of our in-house service's renovation work involves plastering, smoothing walls is about more than just aesthetics. Modern, smooth surfaces can actually reduce heat loss by up to 12% when you pair them with thermal paints. For homeowners in Ringwood updating a bathroom, the return on investment from professional plastering can be as high as 70-80% on resale.
A crucial factor in any method is ensuring the underlying wall is in good nick. Proper preparation is the foundation for a flawless finish, regardless of whether you choose to skim, sand, or re-board.
Making the right choice upfront saves a massive amount of time and frustration down the line. Before you commit, it’s vital to understand the prep work involved. For more detailed guidance, check out our guide on how to prepare walls for plastering. Our in-house service's sees a lot of jobs in Bournemouth that could have been much easier if the initial planning had been more thorough.
The Complete DIY Guide to Skim Coating in Highcliffe
For anyone wondering how to smooth textured walls, skim coating is the gold standard. It's the process of turning a bumpy, dated surface into a pristine, modern canvas. In fact, it's the very method our in-house service's professional teams use for projects from Highcliffe to Poole because it delivers a finish that’s second to none. Consider this your practical playbook for getting it right on your own.
The idea is to apply very thin layers of joint compound over the existing texture, gradually building up a completely new, flat surface. It’s a skill that definitely requires patience and a bit of finesse, but the stunning results are well worth the effort.
Room Preparation and Essential Tools
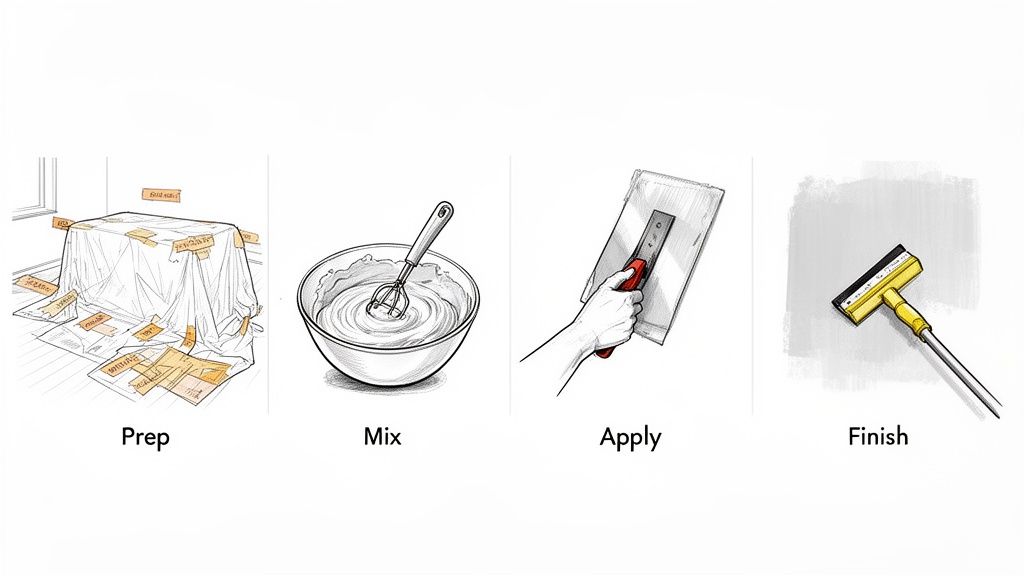
Before you even think about cracking open a tub of joint compound, you need to get the prep work sorted. This is the stage that separates a frustrating mess from a successful project, so don’t be tempted to cut corners.
Start by clearing the room of absolutely everything. Cover your floors from wall to wall with heavy-duty dust sheets and use masking tape to secure them right up to the edges. You’ll also want to tape off all your skirting boards, window frames, and light switches to keep them plaster-free.
To pull off a successful skim coat, you’ll need the right gear:
Joint Compound: For beginners, a pre-mixed, all-purpose compound is usually the easiest to work with.
Trowel and Mud Pan: A 10- or 12-inch taping knife or trowel is perfect for applying the compound.
Pole Sander: This is a must-have for achieving a smooth finish without killing your arms and shoulders.
Fine-Grit Sandpaper: Stick with 120-150 grit for that final sanding stage.
Safety Gear: A P3-rated dust mask and safety goggles are non-negotiable.
Getting the wall ready is absolutely critical. Even modern tools like an AI interior design wall touch-up tool for priming, cleaning, and prepping walls can help get your surface primed and ready for a much smoother finish.
Mixing and Applying the First Coat in Bournemouth
The real secret to a smooth application lies in the consistency of your joint compound. You’re aiming for a texture that’s like smooth cake batter or thick yoghurt—thin enough to spread easily but not so watery that it drips everywhere. Just add a small amount of water to your pre-mixed compound and give it a thorough mix.
With your compound ready in the mud pan, start applying a thin, even layer to the wall with your trowel. Hold the trowel at a low angle (around 15-20 degrees) against the wall to spread the compound, then increase the angle to smooth it out and scrape off any excess.
The goal of this first coat isn't perfection; it's all about filling in the low spots of the original texture. Just focus on getting a consistent, thin layer across the entire surface. Don’t get hung up on minor ridges or imperfections at this stage.
If you want to get a better feel for the technique, have a look at our guide on what skimming in plastering is. It breaks down the fundamentals our in-house service's Bournemouth team uses every single day. Let this first coat dry completely, which usually takes about 24 hours.
Building Layers and Final Sanding in Southampton
Once that first coat is bone dry, take your trowel and lightly scrape off any high spots or obvious ridges. You’re not sanding yet—just knocking down anything that’s sticking out. Now, you’re ready to apply a second, slightly thicker coat, but this time work in the opposite direction (so, go horizontally if you went vertically before). This little trick helps create a much flatter, more uniform surface.
After the second coat is fully dry, it’s time for the final sand. Attach your fine-grit sandpaper to the pole sander and lightly go over the entire wall. Use long, even strokes and always keep the sander flat against the wall to avoid accidentally creating grooves. The aim here is to smooth out any remaining trowel marks until you have a finish that’s as smooth as glass.
The value of a professional finish can’t be overstated, particularly for homeowners looking to update a kitchen or bathroom. Manually-applied plaster, which is perfect for smoothing uneven textures, commanded a 45.25% revenue share in the UK’s £78.9 million gypsum sector. For landlords across Dorset, smooth walls can boost property values by as much as 5-10%.
Once you’re happy with the smoothness, wipe the walls down with a damp cloth to get rid of all the dust. Apply a good quality primer, and you're finally ready to paint. While it’s certainly a demanding DIY project, the flawless result is something you’ll appreciate every time you walk into the room. It’s exactly the standard of finish our in-house service's delivers across Southampton and beyond.
Sanding and Overboarding: Other Routes to Smooth Walls
While a fresh skim coat is often the go-to for a flawless finish, it’s not the only tool in the toolbox. Depending on your walls, budget, and how much dust you can tolerate, there are a couple of other ways to tackle that texture.
For homes in Southampton or Christchurch dealing with a very light texture—think a faint 'orange peel' effect—you might get away with just sanding the surface down. It's a direct approach that can work wonders on minor imperfections.
Be warned, though: this isn't a clean job. Sanding plaster creates a phenomenal amount of fine dust, and you have to be meticulous about containment. Before you even think about starting, seal the room completely. We’re talking plastic sheeting taped securely over every doorway, vent, and gap.
Safety first, always. When you're sanding, a P3-rated dust mask is non-negotiable. It protects your lungs from microscopic plaster and paint particles. Good safety goggles are just as crucial. Skimping on proper protective gear is a shortcut to serious health problems down the line.
When Overboarding Is the Smartest Choice in Poole
Sometimes, you come across walls that are so heavily textured, damaged, or uneven that sanding or skimming feels like trying to hold back the tide. In these cases, the most effective solution is often the simplest: cover the problem up completely with new plasterboard.
This method, known as overboarding, is exactly what it sounds like. You're essentially creating a brand-new, perfectly flat wall surface right on top of the old one. It’s the quickest path to a perfect finish, saving you the messy, labour-intensive job of dealing with the existing texture. Our in-house service's often recommends this for badly damaged walls.
The process involves a few key steps:
Finding the Studs: First, you'll need to locate the vertical timber studs in the existing wall. These provide the solid anchor points for the new boards.
Measuring and Cutting: The new plasterboard is cut to size, making sure to carefully mark and cut out openings for sockets, switches, and other fittings.
Fixing the Boards: Using drywall screws, the new plasterboard is fixed directly to the studs, creating a solid and secure new layer.
Taping and Jointing: Finally, the seams between the new boards are taped and filled with jointing compound. This is feathered out to create one seamless, smooth surface, ready for paint.
And if your ceilings are just as textured as your walls, the principles for tackling them are quite similar. This guide on how to remove a popcorn ceiling is a great resource that walks through a comparable process.
Ultimately, deciding which method is right for you is a balancing act between the state of your walls, your budget, and how confident you are in your DIY skills. No matter which route you take, the final step is prepping the new surface properly. Knowing how to prepare walls for painting like a pro will make sure all your hard work results in a finish you can be proud of.
For homeowners in Poole or Ringwood facing a bigger challenge, our in-house service's team at Hallmoore Developments can pop over, assess your walls, and give you honest advice on the best way forward.
Troubleshooting Common DIY Wall Smoothing Mistakes in Christchurch
Even with the best intentions, learning how to smooth textured walls can throw a few curveballs. Don't be discouraged if your first attempt isn't perfect; most common DIY mistakes are entirely fixable. The key is spotting the issue early, so you can get that flawless finish you're after for your Christchurch or Poole home.
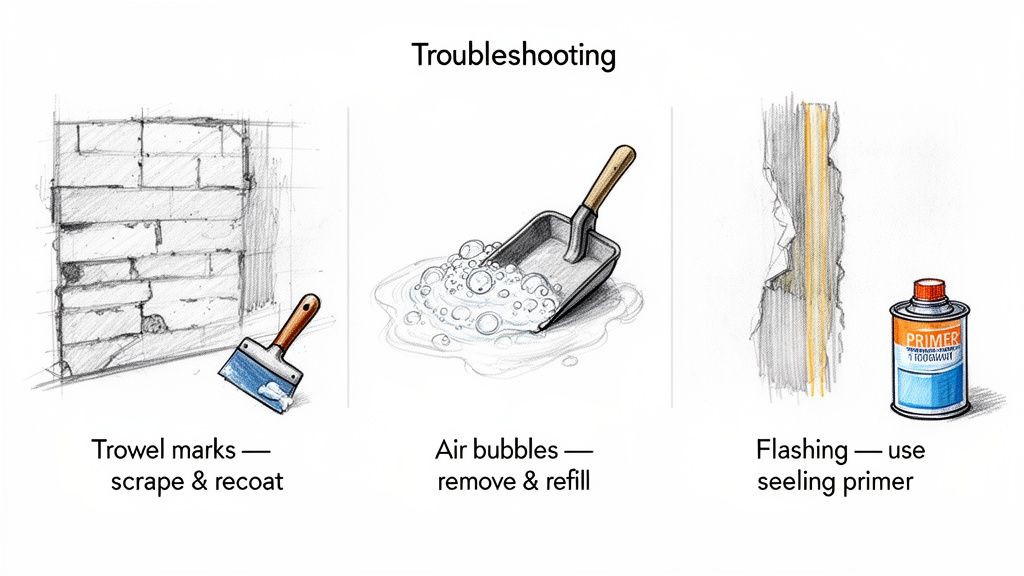
Visible trowel marks, annoying air bubbles, and a patchy paint effect called 'flashing' are the usual suspects. While they can feel like a setback, each problem is typically just a small slip-up in technique or prep that a bit of patience can sort out. If you get stuck, our in-house service's is always here to help.
Fixing Bubbles and Trowel Marks in Ringwood
Air bubbles are a classic snag. They pop up when air gets trapped underneath a fresh skim coat. If you see them forming, step back and let the area dry completely. Once it's hard, take a sharp scraper, slice the bubble open, and clear out any loose bits. A small dab of compound will fill the void, and a quick sand once it's dry will make it disappear.
Trowel marks and ridges are another tell-tale sign of a first-timer.
The Cause: This usually happens from holding the trowel at too steep an angle or not applying even pressure across the blade.
The Fix: Wait for the skim coat to dry fully. Then, grab your taping knife and gently scrape down the high spots before giving it a light sand. On your next coat, really concentrate on keeping the trowel at a low, consistent angle.
A few small imperfections are just part of the learning curve. The trick is to fix them between coats. Trying to smooth them out while the compound is still wet almost always makes it worse.
Preventing Paint Flashing in Southampton
'Flashing' is that frustrating effect where you can see the sheen of your patched areas right through the final coat of paint. It happens because the fresh joint compound soaks up paint differently than the rest of the wall.
The fix is simple but absolutely essential: always use a dedicated primer. A quality primer seals the new surface, creating a uniform base so your topcoat of paint absorbs evenly. No more patchy finish.
These troubleshooting tips can get you back on track, but they also show where experience makes a real difference. Here in the South, where around 35% of homes have dated textured walls, our professional teams sidestep these common pitfalls from the get-go. Using advanced plastering machines, our in-house service's can get the job done up to 60% faster than by hand, avoiding the typical 30% rework rate we see on DIY projects.
The principles for fixing blemishes on walls often apply to other surfaces, too. If you're dealing with similar issues on a ceiling, you might find our guide on how to repair cracked ceiling plaster like a pro really useful. And of course, our in-house service's team in Bournemouth is always here to help you get a perfect result without the DIY headaches.
Your Wall Smoothing Questions, Answered
When it comes to tackling textured walls, homeowners often have the same handful of questions pop up. Getting straight answers is key to planning your project, whether you're a DIY enthusiast in Highcliffe or considering professional help for your home in Bournemouth. Let's get into some of the most common queries our in-house service's hears.
Think of this as a quick chat to help you understand the real scope, costs, and crucial steps involved. A bit of know-how goes a long way toward getting that flawless finish you're picturing.
How Much Should Professional Wall Smoothing Cost in the UK?
The cost for a professional skim coat does vary, but as a general guide, you can expect to pay between £250-£500 per room. What pushes the price to the lower or higher end of that scale? A few things: how deep the original texture is, the height of your ceilings, and of course, your location, whether that's Southampton or Christchurch.
While going the DIY route definitely saves on labour, don't forget to budget properly for all the tools and materials you'll need. For a guaranteed perfect result without the stress, we always suggest getting a clear, transparent quote from our in-house service's team.
Do I Really Need to Prime a Textured Wall Before Skim Coating?
Yes, absolutely. This is one of those non-negotiable steps our in-house service's sees people skip, and it almost always ends in disappointment. Using a quality PVA sealer or a dedicated plastering primer does two incredibly important jobs.
It controls the suction. This stops the wall from sucking the moisture out of the new plaster too fast, which is a classic recipe for cracking and a weak finish.
It gives the plaster something to grip. A good primer creates a tacky, reliable surface for the new skim coat to bond to, ensuring it stays put for years to come.
Honestly, skipping the primer is probably the most common DIY mistake our in-house service's is called in to fix in homes across Poole. It can unfortunately ruin an otherwise decent plastering job.
Think of primer as the foundation for your new smooth wall. It’s the invisible work that makes sure the visible results are perfect and durable. Proper prep is the true secret to a professional-grade finish.
Can I Just Paint Over a Textured Wall to Hide It?
In a word, no. Simply painting over texture is a bit of a myth. While a very thick, matte paint might ever-so-slightly soften the look of the mildest orange peel texture, it will never make a textured wall truly smooth.
In fact, what usually happens is the opposite. Applying fresh paint, especially with a roller, often highlights the peaks and valleys of the texture, making it stand out even more.
If you want a genuinely flat, modern wall, the texture itself has to go. That means committing to one of the proper methods we've discussed: sanding it down, applying a skim coat, or overboarding with new plasterboard. Our in-house service's can advise on the best option for you.
For any other questions or for a detailed, no-obligation quote for your home in Poole or Ringwood, the Hallmoore developments team is always ready to help. Discover how our expert in-house service's can transform your space by visiting us at https://www.hallmoore.co.uk.
Comments